pwn modules的一点笔记
不可视境界线最后变动于:2023年4月6日 下午
连接
1
ssh -i ~/pwn.college/pwnkey hacker@dojo.pwn.college传文件到dojo或拉取
1
2
scp -i ~/pwn.college/pwnkey [文件] hacker@dojo.pwn.college:
scp -i ~/pwn.college/pwnkey hacker@dojo.pwn.college:[文件] ./可以创建flag的符号链接, 不过除了$HOME其他目录均不能写, 只能在
~/下.
module 1-communication
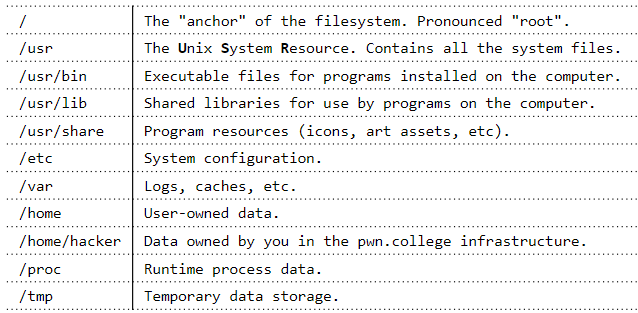
The file system
1 | |
Binary files
教程还是挺绝的, slide可以做为基础知识的详细参考资料. Binaryfiles的slide在这里
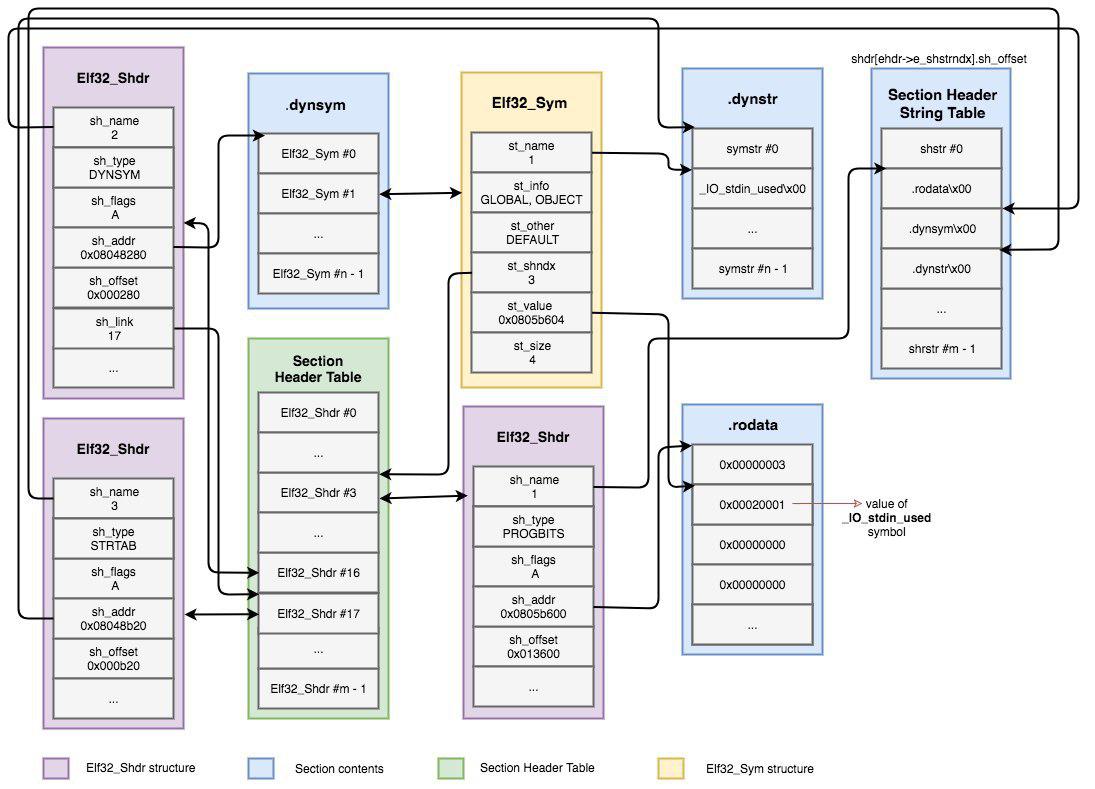
ELF base struct: header-sections-segments
symbols
relocations
dynamic-linking
- ELF is a binary file format.
Contains the program and its data.Describes how the program should be loaded (program/segment headers).Contains metadata describing program components (section headers). - sections gather all needed information to link a given object file and build an executable,
while Program Headers split the executable into segments with different attributes, which will eventually be loaded into memory. - Section headers are not a necessary part of the ELF. Section headers are just metadata.
1 | |
- Several ways to dig in: 在CSAPP里, 当初看的时候被我忽略掉了…
- gcc to make your ELF.
- readelf to parse the ELF header.
- objdump to parse the ELF header and disassemble the source code.
- nm to view your ELF’s symbols.
- patchelf to change some ELF properties.
- objcopy to swap out ELF sections.
- strip to remove otherwise-helpful information (such as symbols).
- kaitai struct to look through your ELF interactively
ELF base struct
ELF files are composed of three major components:
- ELF Header : contains general information about the binary
readelf -h <executable> - Sections : comprise all information needed for linking a target object file in order to build a working executable
readelf -S <executable> - Segments : break down the structure of an ELF binary into suitable chunks to prepare the executable to be loaded into memory
每个section的意义还是要注意一下, 我又倒回来看.got.plt了
注意segment在链接的时候没有作用, section在运行时没有作用.
一方面Segment通过把section分组来提高装载的效率, 另一方面要注意必须和物理页大小对齐, 以便于pte中的权限控制.
Symbols
Provide interface to Linkers and Debuggers to enforce their functionality.
.dynstr是.dynsym的string table, The section .strtab is the String Table of .symtab Symbol Table. 而且string table的entry数量和symbol table的entry数量一致.
relocation
- Defining Relocations
There are different types of relocatable files:
- Generic object files (*.o). 比较简单, 就是一个静态链接的文件.
- Kernel object files (*.ko). wait for future
- Shared object files (*.so).
- These type of relocatable files support being linked on runtime, and they may be shared across different processes. Consequently, relocations of dynamic dependencies have to be done at runtime. This process is known as Dynamic Linking.
Elfxx_Rel and Elfxx_Rela差在一个Addend上, 也就是要重定位的位置和下一条指令地址的差值取反.
其他的部分看原博客就行, 东西太多必须每一段意思都要懂, 不过重定位条目比较少也容易记住.
Dynamic Linking
Overview
Unlike in static linking, ld requires shared libraries to create a dynamically linked executable.
The output file will contain the executable’s code and the names of the shared libraries required.
When the binary is executed, the dynamic linker will find the required dependencies to load and link them together.
Process
The dynamic linking process begins immediately after execution.
With dynamically linked programs, the system executes the file’s “interpreter”, which is an intermediate program that should set up the environment and only then execute the main binary. The interpreter lies in the PT_INTERP segment created by the compile-time linker (ld).
The dynamic linker will set up the environment using dynamic entries from the .dynamic section:
preparing the environment:
- Load the original file’s PT_LOAD segments in memory.
- Use the .dynamic section/segment to read dependencies, search for them on disk and load them in memory as well. This is done recursively for dependent libraries—they can be dynamically linked as well. The dependency searching algorithm is outlined in the ld.so man page.
- Perform relocations – shared libraries are loaded into non-deterministic addresses and must have absolute addresses patched, as well as resolving references to other object files.
- Invoke shared library initialization functions (registered in the .preinit_array, .init, .init_array sections). What happened?
- Finally, pass control back to the original binary’s entry point, making it seem to the binary that control was passed directly from exec.
还讲到了LD_PRELOAD和LD_LIBRARY_PATH变量…还是看原文吧…
Lazy Linking
lazy linking的原因是如果一个程序开头出错了马上退出, rendering useless all of the relocation work performed by the dynamic linker, 所以将一些链接工作放到实际调用的时候.
在CSAPP中看过了, 基本相同, 不同在于提供了IDA的视图看法.
Process Loading
A process is created.
by fork() or clone() and execve().
Cat is loaded.
must be executable
To figure out what to load, the Linux kernel reads the beginning of the file (i.e., /bin/cat), and makes a decision:
If the file starts with #!, the kernel extracts the interpreter from the rest of that line and executes this interpreter with the original file as an argument.
If the file matches a format in /proc/sys/fs/binfmt_misc, the kernel executes the interpreter specified for that format with the original file as an argument.
If the file is a dynamically-linked ELF, the kernel reads the interpreter/loader defined in the ELF, loads the interpreter and the original file, and lets the interpreter take control.
If the file is a statically-linked ELF, the kernel will load it.Other legacy file formats are checked for
notice the interpreter specified in .interp section.
Dynamically linked ELFs: the loading process
The program and its interpreter are loaded by the kernel.
The interpreter locates the libraries.
a. LD_PRELOAD environment variable, and anything in /etc/ld.so.preload
b. LD_LIBRARY_PATH environment variable (can be set in the shell)
c. DT_RUNPATH or DT_RPATH specified in the binary file (both can be modified with patchelf)
d.system-wide configuration (/etc/ld.so.conf)
e. /lib and /usr/libThe interpreter loads the libraries.
a. these libraries can depend on other libraries, causing more to be loadedb.relocations updated
-
/proc/self/maps and attribute((constructor))
Further readings:
How does the Linux kernel run a program
Linux: Understanding the Memory Layout of Linux Executables
Process Execution
用命令行演示了非常多的内容, 基本都没见过我尽量记录下一些细节. 谷歌文档
- Cat is launched.
- Cat reads its arguments and environment.
- Cat does its thing.
- Cat terminates.
上面四个是这一部分要考虑的流程, 我也按流程走:
Cat is launched
__libc_start_main(), 又是这个函数, 不过在这之前还有一个_start(), 形成_start()->__libc_start_main()->main()流程.
可以指定一下LD_PRELOAD参数来改变__libc_start_main()之类的操作
Cat reads arg & env
在下一节中有介绍, 视频里示范了一个改环境变量的例子.
在执行ls指令的时候 添加LANG = C环境变量, 会导致排序按照ASCII码, 否则会按照系统默认的en_US-UTF-8
Cat does thing
讲到了库函数, 系统调用, 信号, 共享内存.
通过nm指令来查看symbol, strace的使用, 以及libc库函数可以不用写头文件, 不过会引起一个隐式声明警告, 可以通过man来查看需要引用什么头文件.
信号演示的时候用了ps pgrep两个指令, 看ps的manual知道了参数有三种风格. 共享内存演示了/dev/shm, 还不知道这怎么用
还有一个进程terminate, 和我在操作系统中看到的一致, 不重复了.
剩下的在PPT里.
命令行参数和环境变量
1 | |
main函数的参数, 其中argv和envp是字符串数组的指针, 所以是二重指针, 两个数组的最后一个元素是null.
就像这样子:
1 | |
env runs a command with a modified environment. 也可以设置特定的环境变量.
1 | |
PIPE
1 | |
参考文档
真的是相当多, 见这里
有个pwntools-cheatsheet比较特别, 应该能用上
WP
怎么会有一百多个, 也太离谱了
基本连接方式: ssh
1 | |
在/challenge/[对应文件]中, 直接执行即可
- 从远程机器复制文件:
1 | |
level(几来着)
要求以0个环境变量运行程序, 可以使用execve函数, env命令, exec命令三种方法
其余的大概就是加环境变量, 加参数, 写在脚本里之类的简单题
level15新东西
新的一个东西: ipython, An enhenced interactive python, 增加了一些特别的功能, 还有个说明书放在本level的末尾.
ssh接上后, 进入ipython, 然后Ctrl+O就可以编辑多行脚本了, 使用的还是pwntools, 算是熟悉一点.
有两种方法:
!exec /challenge/embryoio_level15- 用
pwn.process()
Python – An enhanced Interactive Python
IPython offers a fully compatible replacement for the standard Python
interpreter, with convenient shell features, special commands, command
history mechanism and output results caching.
At your system command line, type ‘ipython -h’ to see the command line
options available. This document only describes interactive features.
GETTING HELP
Within IPython you have various way to access help:
? -> Introduction and overview of IPython’s features (this screen).
object? -> Details about ‘object’.
object?? -> More detailed, verbose information about ‘object’.
%quickref -> Quick reference of all IPython specific syntax and magics.
help -> Access Python’s own help system.
If you are in terminal IPython you can quit this screen by pressing q.
MAIN FEATURES
Access to the standard Python help with object docstrings and the Python
manuals. Simply type ‘help’ (no quotes) to invoke it.Magic commands: type %magic for information on the magic subsystem.
System command aliases, via the %alias command or the configuration file(s).
Dynamic object information:
Typing ?word or word? prints detailed information about an object. Certain
long strings (code, etc.) get snipped in the center for brevity.Typing ??word or word?? gives access to the full information without
snipping long strings. Strings that are longer than the screen are printed
through the less pager.The ?/?? system gives access to the full source code for any object (if
available), shows function prototypes and other useful information.If you just want to see an object’s docstring, type ‘%pdoc object’ (without
quotes, and without % if you have automagic on).Tab completion in the local namespace:
At any time, hitting tab will complete any available python commands or
variable names, and show you a list of the possible completions if there’s
no unambiguous one. It will also complete filenames in the current directory.Search previous command history in multiple ways:
Start typing, and then use arrow keys up/down or (Ctrl-p/Ctrl-n) to search
through the history items that match what you’ve typed so far.Hit Ctrl-r: opens a search prompt. Begin typing and the system searches
your history for lines that match what you’ve typed so far, completing as
much as it can.%hist: search history by index.
Persistent command history across sessions.
Logging of input with the ability to save and restore a working session.
System shell with !. Typing !ls will run ‘ls’ in the current directory.
The reload command does a ‘deep’ reload of a module: changes made to the
module since you imported will actually be available without having to exit.Verbose and colored exception traceback printouts. See the magic xmode and
xcolor functions for details (just type %magic).Input caching system:
IPython offers numbered prompts (In/Out) with input and output caching. All
input is saved and can be retrieved as variables (besides the usual arrow
key recall).The following GLOBAL variables always exist (so don’t overwrite them!):
_i: stores previous input.
_ii: next previous.
_iii: next-next previous.
_ih : a list of all input _ih[n] is the input from line n.Additionally, global variables named _i<n> are dynamically created (<n>
being the prompt counter), such that _i<n> == _ih[<n>]For example, what you typed at prompt 14 is available as _i14 and _ih[14].
You can create macros which contain multiple input lines from this history,
for later re-execution, with the %macro function.The history function %hist allows you to see any part of your input history
by printing a range of the _i variables. Note that inputs which contain
magic functions (%) appear in the history with a prepended comment. This is
because they aren’t really valid Python code, so you can’t exec them.Output caching system:
For output that is returned from actions, a system similar to the input
cache exists but using _ instead of _i. Only actions that produce a result
(NOT assignments, for example) are cached. If you are familiar with
Mathematica, IPython’s _ variables behave exactly like Mathematica’s %
variables.The following GLOBAL variables always exist (so don’t overwrite them!):
_ (one underscore): previous output.
__ (two underscores): next previous.
___ (three underscores): next-next previous.Global variables named _
are dynamically created ( being the prompt
counter), such that the result of outputis always available as _ . Finally, a global dictionary named _oh exists with entries for all lines
which generated output.Directory history:
Your history of visited directories is kept in the global list _dh, and the
magic %cd command can be used to go to any entry in that list.Auto-parentheses and auto-quotes (adapted from Nathan Gray’s LazyPython)
Auto-parentheses
Callable objects (i.e. functions, methods, etc) can be invoked like
this (notice the commas between the arguments)::In [1]: callable_ob arg1, arg2, arg3and the input will be translated to this::
callable_ob(arg1, arg2, arg3)This feature is off by default (in rare cases it can produce
undesirable side-effects), but you can activate it at the command-line
by starting IPython with--autocall 1, set it permanently in your
configuration file, or turn on at runtime with%autocall 1.You can force auto-parentheses by using ‘/‘ as the first character
of a line. For example::In [1]: /globals # becomes 'globals()'Note that the ‘/‘ MUST be the first character on the line! This
won’t work::In [2]: print /globals # syntax errorIn most cases the automatic algorithm should work, so you should
rarely need to explicitly invoke /. One notable exception is if you
are trying to call a function with a list of tuples as arguments (the
parenthesis will confuse IPython)::In [1]: zip (1,2,3),(4,5,6) # won't workbut this will work::
 In [2]: /zip (1,2,3),(4,5,6)
 ------> zip ((1,2,3),(4,5,6))
 Out[2]= [(1, 4), (2, 5), (3, 6)]
IPython tells you that it has altered your command line by
displaying the new command line preceded by –>. e.g.::In [18]: callable list -------> callable (list)Auto-Quoting
You can force auto-quoting of a function’s arguments by using ‘,’ as
the first character of a line. For example::In [1]: ,my_function /home/me # becomes my_function("/home/me")If you use ‘;’ instead, the whole argument is quoted as a single
string (while ‘,’ splits on whitespace)::In [2]: ,my_function a b c # becomes my_function("a","b","c") In [3]: ;my_function a b c # becomes my_function("a b c")Note that the ‘,’ MUST be the first character on the line! This
won’t work::In [4]: x = ,my_function /home/me # syntax error
level16
从这题开始使用这个脚本, glob可根据 Unix 终端所用规则找出所有匹配特定模式的路径名
1 | |
level17
这题检查参数argv[1]. 要注意的是pwntools的process方法以前我都是直接使用process(“file/path”), 实际上是写到了argv[]的第0个位置, 如果executable(Path to the binary to execute)为None, pwntools则会使用argv[0], 这就是为什么往参数里写路径就可以执行的原因.
写成这样即可:
1 | |
level18-21
- 18: 是环境变量, 在process的参数里加个
env={“balabala”=“blabla”}就可以了. - 19: 是重定向stdin.
1 | |
有一个问题: 上面的代码应该都是正确的, 但是只有再补充一句p.interactive()的时候最后两行flag才显示出来, 原因暂未知晓
- 20:
1 | |
- 21
需要清空环境变量.
注意到process这个函数中的env默认会继承python的环境变量就可以了, 必须手动清空
1 | |
level 22-28
- 22: 这部分是使用命令行执行python来执行程序的, 比较简单.
1 | |
- 23-28: 重复一遍上面的工作, 比如0 environment, redirect stdin and out, 等等这些.
level 29-34
从这个开始就要编译C程序了, 29写下面这一段, 30输入一个密码.
值得注意的是, 如果直接调用execve, 那么会导致bash在执行.
如果没有waitpid, 那么子进程会被/docker/init(在我的ubuntu20.04上是/sbin/init)接管.
1 | |
- 31: 真的绝了, “a”原本写的是””, 父进程都不对, 过了一会儿重新编译又好了, 莫名其妙.
1 | |
- 32: 直接修改envp好像会出问题, 原因未知.
1 | |
- 33: 这个就是c语言版本的重定位, 还附带父进程检查的那种. 考虑到execve系列函数会直接继承原来进程的大部分属性, 比如输入输出流, 所以直接对c程序重定向即可, 子进程直接继承.
- 34: 输出重定向.
level35-
35: 用脚本运行, 可以不需要fork, 直接execve
36: 输出要是到cat的PIPE, 直接在命令行里输入:
./c | cat即可37:
./c | grep -E "*"结束38:
./c | sed "="39:
./c | rev | rev40: 使用管道重定向stdin, 去看了下c中的PIPE操作.暂时没有发现怎么用在这道题目上.
直接来一手三重套娃, 这样子cat就不会马上终止了. md不用也可以, 是我想复杂了.
1 | |
1 | |
- 41: 重定向stdout. 一样做法.
- 42:
bash x.sh | cat - 43: grep
- 44: sed
- 45: rev
- 46: 我累了
level??
1 | |
module 2-misuse
WP
这部分的题目就是利用被设置suid的程序来以root的权限去读文件, 无论看起来是有多么的不可能.
cat head tail rev nano emacs vim od more less sort hd(hexdump) xxd base32(64) split gzip bzip2 zip&unziptar ar cpio genisoimage env find make
- od:
od -t x8z -v -w 10 /flag硬是拼出来.
1 | |
hd /flag(hexdump)xxd -c60 /flag每行60个base32 /flag | base32 -dsplit: split file into pieces.
split /flaggzip -c /flag | gzip -cdbzip2 有新的机制, 不过命令行参数和gzip非常接近
zip - /flag > aaand thencat aaorunzip -p aatar cf flag.tar flagthentar -xOf flag.tar研究了半天tar的参数, main operation那几个参数每次必须加上. f参数后紧跟文件名ar c flag.ar flagthencat flag.ar发现经过root用户创建完archive之后直接就对其他用户可读了…更简单了(23- ) cpio genisoimage: ???
echo "/flag" | cpio -ov > ~/flag.cpiothencat flag.cpio不是直接将/flag放到cpio的stdin中……他只要name-list……
env也行?太神奇了.
env cat /flagfind /flag -maxdepth 0 -exec cat '{}' \;
module 3-asm
就是汇编代码的写
3 简单乘法
要注意mul指令默认被乘数放在rax里面, 乘数由我们指定, 结果是拼接而成的: RDX:RAX
1 | |
4-5 除法
被除数放在RAX, 除数待定, 结果放在 RAX, 余数放在RDX
1 | |
6: 低位寄存器的名称
低位寄存器的名称要特别注意, rdi就是这么写错了, mov的两个操作数如果长度不匹配会报错:unsupported instruction 'mov'
| Name | Notes | Type | 64 | 32 | 16 | 8 |
|---|---|---|---|---|---|---|
| rax | Values are returned from functions in this register. | scratch | rax | eax | ax | ah and al |
| rcx | Typical scratch register. Some instructions also use it as a counter. | scratch | rcx | ecx | cx | ch and cl |
| rdx | Scratch register. | scratch | rdx | edx | dx | dh and dl |
| rbx | Preserved register: don’t use it without saving it! | preserved | rbx | ebx | bx | bh and bl |
| rsp | The stack pointer. Points to the top of the stack (details coming soon!) | preserved | rsp | esp | sp | spl |
| rbp | Preserved register. | preserved | rbp | ebp | bp | bpl |
| rsi | Scratch register. Function argument #2 in 64-bit Linux | scratch | rsi | esi | si | sil |
| rdi | Scratch register. Function argument #1 in 64-bit Linux | scratch | rdi | edi | di | dil |
| r8 | Scratch register. These were added in 64-bit mode | scratch | r8 | r8d | r8w | r8b |
| r9 | Scratch register. | scratch | r9 | r9d | r9w | r9b |
| r10 | Scratch register. | scratch | r10 | r10d | r10w | r10b |
| r11 | Scratch register. | scratch | r11 | r11d | r11w | r11b |
| r12 | Preserved register. You can use it, but you need to save and restore it. | preserved | r12 | r12d | r12w | r12b |
| r13 | Preserved register. | preserved | r13 | r13d | r13w | r13b |
| r14 | Preserved register. | preserved | r14 | r14d | r14w | r14b |
| r15 | Preserved register. | preserved | r15 | r15d | r15w | r15b |
1 | |
8-9 bitwise op
1 | |
10. 开始内存操作
注意add没有 add mem, imm这种形式, 因为时钟周期根本不够
1 | |
11.简单的rax, eax, ax, ah, al的使用.
12.要注意时钟周期的问题. 常数要先移动到寄存器
1 | |
13.利用地址偏移, 简单的.
14-16.栈相关指令. 太简单了, 都是些基础题, 过了就算了
17. 跳转
nop的数量数错了, 诶他说的是0x51 bytes from current position, 但是这指的是jmp后面一条指令的地址. 不是jmp的起始地址…..
还要注意绝对跳转只能是间接跳转(line 6)( 要和条件跳转只能是直接跳转一起记清楚 )
1 | |
18.if-elif-else连环, 要注意的是他说[rdi]是一个双字, 可能是一个负数, 所以我第一次写的QWORD PTR就错了, 只能是DWORD PTR
1 | |
19.条件跳转只能是直接跳转
1 | |
20.折腾了半天, 发现题目描述有错的地方, 这里明明是DWORD, 说成quad word.
还有一点被我忽略了, 如果按照add eax, ebx的做法, 那么超出四字节的部分会被舍弃
这里我想到的做法是用eax取出双字数据, 然后用rax做加法.
1 | |
21.硬是没有简化成
1 | |
22.调用
又是折腾了半天, 主要是逐字节比较的, 从题干也看不出来啊, 孤零零的[src_addr]真就指一个BYTE
1 | |
23.偷懒, 用了别人的代码, 复习操作系统去了
1 | |
1 | |
module 4-sc
基本全在PPT里面.
0.基本操作
- intro:
Buiding shellcode: just using pwntools.
Debugging: strace or gdb
- common challenge:
forbidden bytes: such as
NULL('\0'),whitespace,'H'and so on.self-modifying codes in level 5.
gcc -Wl,-N --static -nostdlib -o test test.sto make writable.textsegmentmultistage shellcoding:
read into later bytes; or read intoread(0, rip, 1000)(usinglea rax, [rip]get rip)Shellcode Mangling:
work backwards or jump over some parts to avoid them.Unable to speak:
if you can communicate one bit, then you can communicate.
such as a exit code? maybe inefficient. or signal? or …
- Remain injection points: JIT, jus-in-time, 即时.
avoid null-bytes:
1 | |
1.开始
非常直接的一道题目, 不过我重新认识了一下shellcode, 原来amd64.open做的事情还包括防止指令序列中出现'\0', 以前用的都没有细想这个问题. 不过前两题都是用的read函数直接读取stdin直到eof, 所以不需要担心空字符的问题.amd64.open这个函数我都没有在文档里面查到.
1 | |
测试程序直接从stdin读取bytes然后存储到数组中, 把数组指针转换成函数指针调用即可执行shellcode.
附一个asm, 了解一下原理.
1 | |
2.emmmm
This challenge will randomly skip up to 0x800 bytes in your shellcode. You better adapt to that! One way to evade this is to have your shellcode start with a long set of single-byte instructions that do nothing, such as
nop, before the actual functionality of your code begins. When control flow hits any of these instructions, they will all harmlessly execute and then your real shellcode will run. This concept is called anop sled.
1 | |
使用右对齐, fillchar='\x90’. 即payload = asm(shellcode).rjust(0x800, ‘\90’);
1 | |
4.造一个跳板
使用encode函数: No encoders for amd64 which can avoid b’H’
mov的一种编码第一个字节就是H, 所以没有办法.
只能使用先read再jmp的方法.
1 | |
5.禁用syscall系列
啊这, 我这……. 折腾了半天重新看了看课件终于知道他要考我什么了.
还可以用mov byte ptr [rip + s01], 0x0f这样的来改变shellcode本身. 依据在于将0f05两个字节分开来.
1 | |
exploit:
1 | |
6.同上, 限制前0x1000写入权限, 总共可写入0x2000
只要read的buf在后4096字节, 然后
payload = payload.rjust(0x1500, b'\x90')即可.居然栽在rjust这个函数上: 第一次以为rjust直接修改bytes, 但发现是个不可修改的class, 然后发现width是指修改完后的长度而不是直接在左边填充多少fillchar…
7.关闭stdio
照着课件的说法是每次返回1bit都能communicate…….
不过直接打开另外一个文件就行了. 居然栽在open syscall的o_flag上, 应该给个O_WRONLY或者O_RDWR.
shellcraft的open函数能接受int的o_flag或者字符串类型的flag. 只支持大写(这不是当然么, 汇编器只支持这种宏定义).
1 | |
8.限制写权限
而且第一次只有0x12(18)字节的汇编字节可以输入. 后面的字节使用了
mprotect(shellcode_mem, 4096, PROT_READ|PROT_EXEC)来限制再次write.
emmmmmm……….
tips:
In fact these are a lot of bytes. Try different sys calls. There are other ways to read a flag as well
Search for a syscall that takes minimal argument so as to decrease size
找了半天, 只有个chmod能用, 居然刚好18字节, 真绝啊. 一开始想着读取文件肯定是做不到的, 因为只能写到buffer上, 塞不下更多的逻辑了. 18个字节真的太少, 只能换一个方向而去改变他的权限, 然后就可以任意读取了.
为了尽量节省空间, '/flag'放在了bytes的最后, 由起始地址addr计算出/的位置, 取代s1中9所在位置.
1 | |
不一定要用这种替换, 可以使用
lea rdi, [rip+0x??], 或者下面这个chown系统调用.
2
3
4
5lea rdi, [rip+0xf]
mov si, 0x3e8
mov dx, si
mov al, 92
syscall # chown(const char *pathname, uid_t owner, gid_t group)
13.同上, 而且变成0xc字节, 看来只能chown或者chmod了, 这里用chmod.
?????好吧应该push到栈上, 然后再mov rsp, 这样子才能大幅度地减少字节长度.
而且由于是小端法存储, 自然地就有7个空字符在0x66后面.
gdb一看rax是put函数的返回值, 直接就是0. 这点挺重要: 利用可预测的寄存器的值
1 | |
第二种方案是execv, 去执行shell, 不过文件开头要这么写#!/bin/sh -p, -p是防止默认的重置SUID操作. shell里面直接写cat /flag就成了
9.被动修改
This challenge modified your shellcode by overwriting every other 10 bytes with 0xcc. 0xcc, when interpreted as an
instruction is anINT 3, which is an interrupt to call into the debugger. You must avoid these modifications in your
shellcode.
1 | |
10.sort ur shellcode
每8个字节作为一个64位无符号数, 使用冒泡排序升序排列. emmmmmm……
非常刚好的每8字节从小到大排序, 主要的思想就是代码尽量少, 打开文件和读写放到另外一个文件中(c写的读文件), execve会继承父进程权限.
1 | |
11.同上, 关闭stdin
上一题仍然继续用.
12.每个byte得unique
ascii_values = [ord(character) for character in text]python字符串=>ASCII
1 | |
出乎意料的简单, 只要把第二个xor改成lea指令去清空edx就可以了. 一开始改的mov还不行.
14.只读6个字节
好像只能2-stage shellcode, emmmmmmmm…….
仍然是利用了rax等于0, rdx是shellmem地址, 也可以当做是要读取的字节数使用read函数的话只有rsi(第二个参数)需要改为rdx上的地址, 简单mov就可以了. 然后第二阶段随便整.
1 | |
module 5-jail
chroot(“/tmp/jail”)
chroot(“/tmp/jail”) does NOT:
Close resources that reside outside of the jail.
cd (chdir()) into the jail.
Do anything else!you can use openat and execveat:
int openat(**int dirfd**, char *pathname, int flags);这两个函数的path如果是绝对路径, 那么dirfd就会被忽略;
如果path是相对路径, 而且dirfd是合法的, 那么path所引用的就是dirfd所表示的路径.如果再次chroot会发生什么? kernel对此是完全不知情的.
Generally, a user with an effective ID of 0 (i.e., a process run as root or SUIDed to root) can always break out of a chroot, unless the chroot syscall is blocked!
Also missing other forms of isolation: PID, network, IPC
Replacements: cgroups, namespaces, seccomp
seccomp:
gcc -o test test.c -lseccompseccomp-tools dump ./test- 原理是eBPF, seccomp就是使用的eBPF来实现的, 还可以用来实现一系列system trace tools
break out seccomp: Generally, to do anything useful, a sandboxed process needs to be able to communicate with the privileged process. 有两点可能, 第一是syscall很多, 有些可能可以被利用, 第二是开发者可能为了不破坏功能而在权限方面犯错误.
- permissive policies: ptrace() sendmsg() prctl() process_vm_writev()
- syscall confusion: on some systems, you can switch between 32-bit mode with 64-bit mode in the same process, and the syscall numbers are different between architectures. 比如说系统调用分别是
int 0x80 and syscall(\xcd\x80 and \x0f\x05), 系统调用号也不同. - kernel vulnerabilities in the syscall handlers: Over 30 chrome sandbox escapes in 2019 link
- data exfiltration: such as sleep(), exit(), normal or crash. Or use DNS queries to bypass network egress filters.
Redirections很重要. link
补充:
- 实际测试中在shell里面直接使用chroot命令并不会发生escape, 只能在c代码中使用chroot库函数. 猜测可能是因为chroot的命令行对系统调用进行了一层封装, 加上了跳转到jail里面的目录中; 而libc库中只是单纯的系统调用, 并没有chdir这个步骤.
- 好几个函数都有
at的版本, chmod->fchmodat, open->openat(open只是libc中对openat的封装) and so forth.
1.exemplify
相当简单, 直接利用程序中chroot后没有切换到jail里面的特点, 更改cwd为真正的根目录, 第一个参数填写为flag, 最后open的时候由于flag是相对地址, 会以真正的根目录作为基准来定位true flag.
2.同第一题
第一个参数不能含有flag字符串, 是为了禁止直接打开flag文件. 在这个challenge中还可以注入shellcode,
也没什么难的, 只要在shellcode里面打开‘flag’然后写到stdin里面就可以了.
1 | |
3.move in
参数不能含有flag子串, 打开文件时有O_NOFOLLOW标志, 软连接无效, 而且在chdir之前只有一个open.
也不能在命令行里打开flag, 包括符号链接. 要跳出chroot也许只剩下再次chroot. 好像也不行, 看了看视频应该要用openat.
在kali上试试chroot. openat成功了.
- directory stream file descriptor和file descriptor不是同一个东西, 具体资料待查. openat只能用dirfd.
- 命令行里打出
./chroot flag 6<.即可, 会打开当前文件夹且dirfd=6. - 也可以直接打开fd=3, 这个是命令行第一个参数, 而且在chroot前被打开, 可以被openat使用.
1 | |
4.seccomped -> openat
每一题的要求都在逐渐增加. 这一题仍然可以用openat, 没有变化.
5. linkat
1 | |
6.fchdir
1 | |
7.没有at了
允许的syscall:
1 | |
使用再次chroot:
1 | |
8.openat read write send
感觉没什么特别的. 参数已经不限制输入flag了. 直接使用第三题的东西.
9.变成32位
syscall no: 3,4,5,6: close, stat, fstat, lstat. ???????????
哦对, 程序里的seccomp是通过SCMP_SYS() macro来add rule的, 然后又把arch设置成x86_32, 这样的话就是32位的read write open close这四个系统调用了. 而且没有chroot.
尝试使用pwntools遇到各种各样的问题.
- 64和32代码是怎么切换的? int 0x80 and syscall吗? 是的, 22年10月知道了.
- int 0x80在64位模式下汇编, push最多DWORD. 不然operand mismatch.
- 字符串的地址只能使用汇编中的label, 栈上的地址仍然是64位的, 可能是因为过长导致open不能使用.
- 64位汇编肯定就不能用SYS_read这种了, 只能改成数字.
精简如下(也没多精简):
1 | |
10.side channel communication
都没有chroot了. 这题使用exit每次返回一字节.
1 | |
11.nanosleep
这下子真的是bitwise的收集数据了
遇到的几个问题:
- 偶然会发生broken tube, 不知原因.
- 可以用字符串的format函数.
- 在pwn.college机子上timespec结构体两个成员都是八字节(包括long)
- 被网上抄来的32位程序nasm坑了一把, 现在是64位gas, 基本全改了……….
- setnz是思维导图里看到突然想起来能用的. 以前整得笔记还不错.
- 直接使用label地址会有重定位条目, 必须使用rip来加上标签的偏移来在运行时确定准确的地址.
- 加载地址请用lea……line 15卡了十几分钟…..
- 视频中演示了time命令, 计算程序运行时间.
- 也可以直接写在栈上, 不用在汇编里写上这么一个数据结构.
- 如果把时间范围调大一点也能用时间来表示ascii码值, 也就是一次一字节. 应该更快.
- 视频使用了一个pwn.log.progress和process参数level, 这样子就不会有一堆打开关闭命令了.
1 | |
12.only read
这次换成crash code就行了. -4 is SIGILL, -11 is SIGSEGV
1 | |
13.怎么是socket??
use socketpair to the local communication
感觉没有任何限制啊, 就是构造一点父子进程间特有的命令.
开始gdb refresher!!!!!
module 6-gdb
GDB时间!
- info有好多东西. 看到一个
i proc m(appings), 不就是我上次用的! cat /proc/pid/maps么. - 一份超好看的cheatsheet!
- pwndbg的features
- 神奇的教程网站, 视频是文字. link
- 三种gdb插件–gef(demo网站|doc), 其他两个装好了. 还是peda安装简单, 还能整到pwncollege上. 再用一个插件我会混的….
“Auto-loading safe path” section in the GDB manual.
前几题都没什么特别的, 就是一个refresher.
命令行选项: /challenge/e* -x gdbscrip -q
level4
居然要重复四次, 直接修改推导变量. 而且没有运行前加上断点会出错….原因待查.
level5
开始编写gdb脚本. 没有尝试过的东西, 马上开学.
查看gdb manual, 5.1.7 Breakpoint Command Lists有提到一种特别的写法:
1 | |
Any other command after a command that resumes execution will be ignored.
Can use silent to disable the printing of usual message when stopping at certain breakpoint. Usefull command for contolled output in 23.1.4 Commands for Controlled Output, usually echo, output, and printf
You can also use breakpoint commands to compensate for one bug and test the other!
e.g.
1 | |
好家伙, 每次地址都会变, 得换成相对地址. printf *($rbp-0x18)直接失败, 报attemp to dereferecing a generic pointer. 要想dereference指针得确定指针的类型,
先设断点然后再c(ontinue).
1 | |
真正自己写起来问题怎么这么多……
level6
全自动scrip. 在手册中的
23.1.3 Command Files有介绍一些flow control command. 然后5.1.3 Setting Catchpoints也挺重要.This time, try to write a script that doesn’t require you to ever talk to the program, and instead automatically solves each challenge by correctly modifying registers / memory.
GDB: Printing Variables to File, 不太好用, 毕竟是logging文件.
使用
printf命令来写raw bytes到文件中.commands命令可以为断点添加命令.ddb– interactive kernel debugger
如果要全自动, 我想到的思路是在read /dev/urandom的时候改成从stdin获取, 然后再gdb中使用r < tmp来重定向. 后面的scanf也是从stdin获取, 这样的话就好办了. 为了测试conditionally perform gdb commands, 就不更改循环变量了.
历经挫折:
把文件作为输入而且要多次输入, 每次文件指针都会向后移动的…..所以还是改变内存吧……事实证明没有问题, 不过如果只是简单地>=3会导致flag无法打开. 所以加上4<tmp, if条件换成if $rdi >= 3 && $rdi != 0x44即可.- 这个程序每次都会重新打开/dev/uramdom, 或许是因为新的随机数要重新打开???这样文件指针会大于等于3……
- catch syscall会在syscall之前和之后调用, 所以设置好if语句就行…. (calls to and returns from system calls will be caught.)
- 还把==写成=, 绝
- 还发现了一个, 第六行按理来说已经跳到别的函数了, 毕竟read也只是glibc的封装, 但没注意到的是
__GI___libc_read()这个函数根本没有push rbp, 所以当前栈帧没有变化.
1 | |
一个level能挣这么多东西出来…….
level 7
直接一个call (void*)win()就结束了….
module 7-rev
- forword engineering vs. reverse engineering
cpp du strip stringscommands.- the most often we do is reversing the main modules.
fomit-frame-pointer- cloud ninja 用这个或者直接IDA就行. 都有IDA pro了其他的就随便试试.反正视频里是不可能说用盗版的:laughing:
- 把另一个checksec链接成了secheck, 功能似乎更多一点.
- Open source:
- angr management: an academic binary analysis framework! (github)
- ghidra: a reversing tool created by the National Security Agency (https://ghidra-sre.org/)
- cutter: a reversing tool created by the radare2 open source project (https://cutter.re/)
- dynamic analysis:
- ltrace and strace
- gdb
- context可以直接用display命令在每次停下来的时候模拟.
- Timeless Debugging
- gdb has built-in record-replay functionality (doc)
- rr is a highly-performant record-replay engine (github) doc
- qira is a timeless debugger made for reverse engineering (https://qira.me/)
level1.0-2.1
没有什么特别, 但是2.1这个字符换位置的汇编值得注意:
1 | |
level3
合着每关还有提示这关用了什么……
level3是reverse mangler.
level4
- IDA的汇编语法是使用的MASM(Microsoft Macro Assembler)的. 这里是一些directive.
- IDA使用的high-level IL是IDC, 一个C-like language. 像什么
LOBYTE在手册中有 - 一个
char buf[6]被识别成了int buf + int16_t v6, 改一下buf的定义就成. - 看了看IDA的一些操作.
由于biltw是按照字母顺序排列, 所以一通操作之后没有变化.
level5
This challenge is now mangling your input using the
xormangler with key0xb2
1 | |
好像简单过头了…
level6
reverse + sort + xor
1 | |
属于是python的练习使用
level7
真特么复杂….还有不可见字符只能整成byte写到文件里.
好像挺简单, 但是又有点难(?
1 | |
level8
这合理吗? 就硬堆数量……
level9
噢, 有点东西, 完全看不出来发生了什么, 得反汇编看看.
用的md5, 没有办法reverse, 但是可以修改代码内容.
- IDA 添加类型 在shift+f1的local types中添加. 也就是view中的open subviews. ctrl+1=quick view
- gdb 与 set-uid 程序 与 $base
- IDA number of operand.
因为使用了mprotect()可以修改代码段, 所以直接找到jnz的地方改成jz. 也就是0x1f01处从75改成74.
level10
使用bin_pedding函数把main函数填充到了2xxx的相对地址处, 不过同上.
level11
IDA的rename选项在手册的Give Name to the Location章, 查了下LOCAL and PUBLIC伪指令
我还得查下md5函数怎么用.
直接把整个程序的每个部分进行一个hash, 所以修改其他地方无法通过验证. 而且只能修改2byte.
没事了, 连着改两个jnz就行了.
level12
开始Yan85
- LOAD segment 只是个没有名字的段, IDA默认整个名字上去. 可以在段介绍中看到pure data/code之类的.
- 递归学习:
- 在IDA看到一个
text "UTF-16LE", 'abcdsif', 还以为七个字符是连在一起的. 结果发现UTF-16LE有特别的地方. 直接改成DATA就会出现\0间隔的字符. - 然后就去查16LE是什么. 其实就是UTF-16的little-endian版本. Byte-Order-Mark etc.
- UTF-8优势在于ascii是1byte, 16优势在于非ascii是两字节, 32在于不用encoding and decoding.
- 在IDA看到一个
1 | |
Yan85: a1, a2, a3是arg no.
在main函数中一个256字节的空间(char a1[256+7]), 后面跟着7byte用作七个寄存器的空间. 然后进入execute_program.
describe_register是将数字转换成一个字符, 总共有七个, 每个字符后面都有\0:
aNone db 'NONE',0describe_* 后面的level可能会用到, 到时再说
write_register是将a2用作a1[256~262]的索引, 然后将a3写入数组中.
寄存器
r1 r2 r3 r4 r5 r6 r7**分别是
8 4 64 32 16 2 1**write_memory被用在stm指令中
然后分析每个指令作用: (reg)表示标号对应的寄存器的值.
- imm 就是
(reg)a2 = a3加载立即数. - stm其实就是
mov [(reg)a2 + a1], a3 - syscall(a1, a2, a3), 假设寄存器为r1 r2 ~ r6, 然后if a2 == …
- 8: open
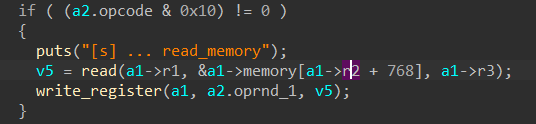
fd = open(&a1[r1], r2, r3); (reg)a3 = fd; - 4: read
v5 = r3+r2>=256 ? -r2 : r3; count = read(r1, &a1[r2], v5)然后count写入reg a3 - 1: write
v5 = r3+r2>=256 ? -r2 : r3; count = write(r1, &a1[r2], v5)然后count写入reg a3 - 16: sleep r1 secs, (reg)a3 = left_time
- 0x20:
exit(r1) - else:
exit( (reg)a3 )
- 8: open
如果是12.1, 估计我写个gdb脚本会更方便我查看执行流程. 在每个函数入口处dumpargs, 然后打印出来. 12.0我就直接看看提示.
woc, 12.1都没有函数名称的, 我还得重命名一下函数.
看了前面的一点, 只要printf "\x94\x11\x3f\xb3" > input 就行. 自动读取flag.
level13
- ldm: load from memory:
(reg)a2 = a1[(reg)a3]- cmp: 两个寄存器结果放在a1[262]里, 第五位作为标志位,
2
3
4
5小于 : 16 第5位
大于 : 8 第4位
等于 : 4 第3位
不等于: 2 第2位
两个全为零:1 第1位- 寄存器
r1 r2 r3 r4 r5 r6 r7
**分别是16 64 1 4 8 32 2**
看视频看到了新方法.
- 遇到了一个指令解析错误, 只能undefine
crash函数, 然后把字节设置成指令 设置函数end 设置新函数. - 完全可以只用静态分析, 既然256字节空间之后跟着的是7个register, 那么可以定义一个结构体, 这样decompilerd result会更准确.
1 | |
- 对于describe_register()函数来说可以定义一个enum变量, 就不用搁那翻译每个寄存器是对应哪个数字了.
1 | |
level14.1
emmmmm好像也没什么意义, 纯粹花时间看懂一个流程罢了. 只是复杂度的简单叠加, 把输入的每个bit进行一个加法操作.
这题是0x81位置上先放九个数, 然后再分别加上一个数字, 然后, 就那样..
level15
还是加上一个数, 勉强做一下. 果然是浪费时间.
level16.1
开始Yan85 byte code. 直接从没有符号的版本入手开始占卜(
IDA反编译出了问题, 实在是逆转前三个字节顺序的汇编代码太神奇, 一堆符号拓展 零拓展什么的. 然后发现并没有问题.
发现指令编码是这样一个结构:
1 | |
在IDA中使用IDC编写脚本(gdb script也行, 也可以设置临时变量之类的).
ADD
1 | |
POP:
1 | |
STM:
1 | |
LDM:
1 | |
CMP:
1 | |
print all regs:
1 | |
设置完之后就会出现非常漂亮的一个输出, 不过很长, 而且这种输出是会跟着程序流变化的, 不利于整体上的静态分析. 下次尝试避开所有跳转, 按顺序打印出所有的代码, 不然跳来跳去的真的很难看.
结果就是简单的判断字符串相等, 总共9字节. 都在log文件里.
level17
1 | |
先跳过, 感觉就是复杂度的堆积, 又或者是我方向错了. 到时回来看.
level18
Yan85 shellcoding. 直接做.0题目, 省点事.
输入0x300uLL字节的bytecode, 前768字节是指令最多256条, 后面是内存空间, 再后面是寄存器.
完全由我控制的话首先是往内存中放入/flag字符串, 然后open(path in memory) -> read to memory -> write to stdout. 再结合一下题目里的寄存器, 操作数和顺序就行. 估计得写个python函数自动生成.
level19
更特别了. 主要是这个rerandomize()函数, 其中寄存器, 指令, 系统调用, cmp标志位全部都是随机的. 随机的方法是8个int8随机选取两个进行交换, 执行65535次.
难道是在变化中找到不变的东西?
噢虽然是随机的但是由于rand的特点(种子和flag有关), 每次的值都不会变, 这样子只要编写一些logic去brute force一些指令和值就可以了.
module 8-exp
- 时至2022年4月22日, c语言排名第二位, 历史最低为第二位. 大部分逆向工具反编译出的结果都是类C语言, 因为c语言是最接近汇编的语言, 还给了开发者一种使用高级语言而不是直接通过汇编去操作寄存器的选择, 被大量使用在操作系统和其他软件的代码中. 而c语言的内存完全控制所带来的问题在near future不会消失, 比如说一些嵌入式设备需要c语言来开发等等.
1 | |
stack canary mitigations:
leak the canary.
brute-force the canary(for forking processes)
modify the canary.
by forking processes, it can test repeatedly and figure out what the canary is.
the canary begins with null-byte.
alsr mitigation:
- because all segments are aligned to 0x1000, so changing the least significant byte in a pointer can redirect the flow to another position.
setarch x86_64 -R /bin/zshcommand
uninitilized data.
- but gcc with high level optimization will probably remove the memset function, as it seems to be pointless.
- 整了pwndbg+tmux的组合视图, 感觉, 有一点点点点用吧…
我是真有精力搞这个…
成功在tmux里面套娃screen. - 使用gdb加上core文件 stackoverflow
- ulimit -c unlimited : 解除core dump文件大小限制, 或者直接加在zshrc里面.
- 然后
gdb-pwndbg [filename] [coredump] - 视频中使用了cyclic加上gdb core来查看返回地址从而发现buf的溢出位置.
- 也可以使用valgrind, 不过参数较多.
- pwn也有coredump函数.
level1-2
简单的忘记了
level3-4
修改返回地址.
level5
gdb 调试出现问题, read一个大数字就会bad address, 直接执行没有出现….
level6
重复利用堆栈, 修改返回地址后顺手改写rbp+0x4开始的四字节为0x1337(4919)
challenge堆栈有没有实用的位置, 应该就是对齐.
发现没啥特别的, 就是固定0x40000地址, 然后跳过win_auth的验证条件直接执行read flag
level7
和rev的18题差不多, 但是Yan85的open syscall被禁用. 他说有个memory error, 在哪里呢.
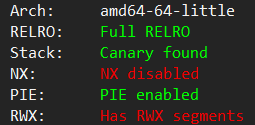
保护全关, 可执行栈. 根本没有open这个libc函数, 需要hijack shellcode, 注入到哪里呢?
发现了, 一个read到栈空间的调用没有检查边界:
- 不过要注意r2和r3只有1字节, 最多就是256.
- 反正各种保护都没开, 可以直接定位shellcode的位置. 总共长36字节.
- shellcode得调用syscall, 还是用chmod简单点, shellcode就加在一开始的byte code中. 对shellcode进行Yan85译码可能会出问题, 在byte code结束之前还要修改r6的值来直接跳到指令的末尾.
- Yan85 code直接从memory[1024]开始, 覆盖8B register, 9B stack space, 8B saved rbp, and finally, the
retaddrto the position of shellcode.- 还有一些细节, 覆盖r6的时候可以直接修改成256在下一次译码结束执行, 这样子就不用多余的操作修改r6.
level8
这题在上一题的基础之上加了canary和PIE.
其余部分应该是一样的, 溢出点也是一样的. 对了, write函数也没有边界检查, 可以利用这个来leak出canary和rbp.
level9
保护半开, 可用open, disallowed read_code, no bundary check in read, but write has.
只允许byte code中出现一次syscall.
但是发现read_memory的目的地变成了指令的区域. 于是就可以使用这个调用来输入新的代码去覆盖旧的.
level10
这次在上一题的基础上补上了read_memory的错误, 仍然只能用用一次syscall. 边界检查全开.
这???
level11
JIT pray, Yan85_64, 保护全开, 全新逻辑, 暂且放弃.
module 9-mem
nothing special.
level1
canary disabled.
inject shellcode to a map region, and then overwrite return address to jmp to executing shellcode.
level2
保护全关. 可执行栈. 确实没有什么东西, 没开PIE的话栈的位置都是一样的, shellcode注入的地点也可以使用绝对地址来确定.
level3
栈上的地址最低12位都是随机的. 怕不是每次运行的时候_start和__libc_start_main函数都会用到不同的栈空间大小…也许是aslr把stackbase也改了.
这下子只能连rbp都给leak出来了.
- first exec
challengeto leak canary and inject shellcode. - second exec to leak first challenge’s rbp, and then calc the shellcode position.
- third exec to jmp to shellcode.
不对, 第一次leak canary的时候也可以leak出main的rbp, 没事了, main的rbp可以用但没必要.
- 没有push imm64这条指令.
- 一开始用chmod+.ascii “flag”的做法, 发现自己加了一个空字符, 只能通过栈来尝试. 想了想, 栈指针加8也不会对第一个challenge的栈帧造成什么影响. 换成下面这个, 注意小端法.
[hex(ord(character)) for character in '/flag'] => ['0x2f', '0x66', '0x6c', '0x61', '0x67'] - 没料到手写shellcode会有一堆的空字符. 放弃手写, 转为pwntool生成.
- size写太大, REPEAT后面的换行符都给读进去了.
- 招架不住canary和rbp里面也有空字符…多试几次就行了
- IDA变量定义错了, 存在一个指向字符数组的指针, read参数还出现了对buf的解引用, 半天没看出来.
1 | |
level4
看起来和上一题没有什么区别, 就是88字节的数组末尾8字节要是一个确定的数字才能正常return.
%s没有限制. executable stack.
1 | |
level5
else repeat加了一个seccomp, 感觉又没什么区别.
level6
这下子真有区别了, seccomp在challenge返回的时候无法避免. 保护一样, 仍然是可执行栈.
只允许write和exit_group. 这是能做的吗? 一次load剩下的执行流程都会被限制.
没事了, 我连他的限制的内容也可以修改. 改成我想要的就行了. 总共允许两个syscall.
改成90 chmod 91 fchmod就行.
level7
加上了PIE. 利用随机地址仍然是4KB对齐来修改最后两个字节, 不过最高四位只能碰运气了(\x29中的’2’)
- 使用vim编辑二进制文件直接把非print字符整成一个问号存起来……换个办法修改好了…..
- 要么使用编辑器, 要么vim中使用
set binary或-b参数, 然后%!xxd
1 | |
level8
heap上malloc一个size区域, 七八十字节, 但是在这个区域中使用strlen, 在一堆ped中加入一个空字符即可.
而且加了PIE. 如同上一题的做法.
level9
保护全开. RELRO
最大的问题是开了canary.
嘶—-我知道了, 利用内存寻址可以跳过canary从而直接修改retaddr.
0x79下一个是0x80也是很可以. 下次写十六进制一定加前缀.
1 | |
level10
已经将flag读到了栈上, 为了printf的%s能够打印出来, 把buf前面110个字节填充为非零, 紧接着就是flag内容, 这样%s的打印就不会在110处停止.
1 | |
level11
保护全开, 这题是mmap的使用, 以前还没看过详细的机制. youtube的一个视频, 还不错.
一连几个mmap都是没有address hint的, 全都连在一起. 而且是向低地址方向map, 最后map的region反而在低地址.

最后的map只指定了0x5c个字节, 不过还是分配了0x1000一整个page, 全为可写可读. 没搞懂的是为什么/flag映射的是只能执行也可以被printf读取出来..
所以结果也很简单, 0x3000字节即可.
level12
仍然是全开.
能重复执行challenge, 难不成是leak canary? 而且还有printf %s.
- 第一次0x19个(因为buf和canary之间有undefined区域)填充字符, leak出canary, 然后再次进入challenge
- 为了能跳转到win, 必须执行完challenge, 即通过canary验证. 第一次执行覆盖了canary第一字节必定不成功, 第二次利用leak出的canary来通过验证并且修改返回地址的低两字节.
- 这么一说感觉得用pwntools来写了.
1 | |
level13
大满开!
重复利用没有清空的堆栈内容. flag在rbp-0x10f开始的0x100字节上. 所以在challenge栈帧中也从这个位置读取即可. 神奇的是有一大块空间没有被定义. 或许是定义了一个数组然后没有使用? 这样的话还不能被编译器优化掉.
v5从rbp-0x120开始, 填上0x20 byte is enough.
1 | |
level14
也是leak canary, the problem is printf() function limit the number of bytes to be output to 452, while buf size if 456 bytes.
………….
level15
TCP连接, 利用fork的特点来绕过canary.
1 | |
- https://docs.pwntools.com/en/stable/tubes/sockets.html, exempli gratia:
1 | |
module A-rop
ROP
- rp++, ROPgadget.
rp++ --unique -r2 -f /bin/bash | grep -P "(add|sub|mov) rax, r.."
- store addresses into registers
- stack pivot: 栈转移.
- data transfer.
- USE INFO IN THE STACK OR REGISTERS.
Counter-CFI(Control Flow Integrity) techniques:
- B(lock)OP: ROP on a block (or multi-block) level by carefully compensating for side-effects.
- J(ump)OP: instead of returns, use indirect jumps to control execution flow
- C(all)OP: instead of returns, use indirect calls to control execution flow
- S(ignreturn)ROP: instead of returns, use the sigreturn system call
- D(ata)OP: instead of hijacking control flow, carefully overwrite the program’s data to puppet it
Intel Edition(endbr64 after ret instruction) is still bypassable by some advanced ROP techniques (Block Oriented Programming, SROP, etc), but it will significantly complicate exploitation.
- The standard blind attack requires a forking service. 就像
- Break ASLR and the canary byte-by-byte. Now we can redirect memory semi-controllably.
- Redirect memory until we have a survival signal (i.e., an address that doesn’t crash).
- Use the survival signal to find non-crashing ROP gadgets.
- Find functionality to produce output.
- Leak the program.
- Hack it.
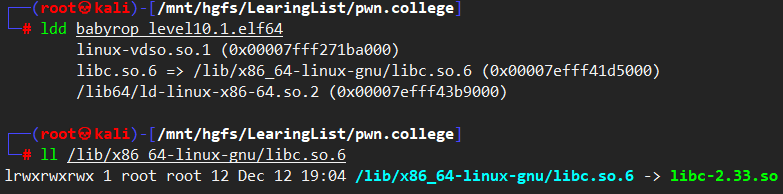
所谓的libc.so.6其实也就是一个符号链接. 如果要更改libc文件直接临时修改一下符号链接还要注意ld和libc的匹配问题. 或者使用patchelf改一下, 链接在这. (那个glibc_all_in_one就在这儿用的)(成天用的都是工具, 真想自己写一个)
YouTube-42视频是rop的新用法… pwntool还内置了rop. 真行啊.
level1
啥主要的保护也没开, 简单的覆盖返回地址.
level2
没开啥保护, 查了一下lseek的使用, 主要就是win函数分成了两个阶段, 一次读一半.
只要在栈上弄两个返回地址就行了. 简单
level3
5个stage, 每个stage都要有对应数字的参数, 简单跳过.
level4
有一整个函数用来提供gadgets.
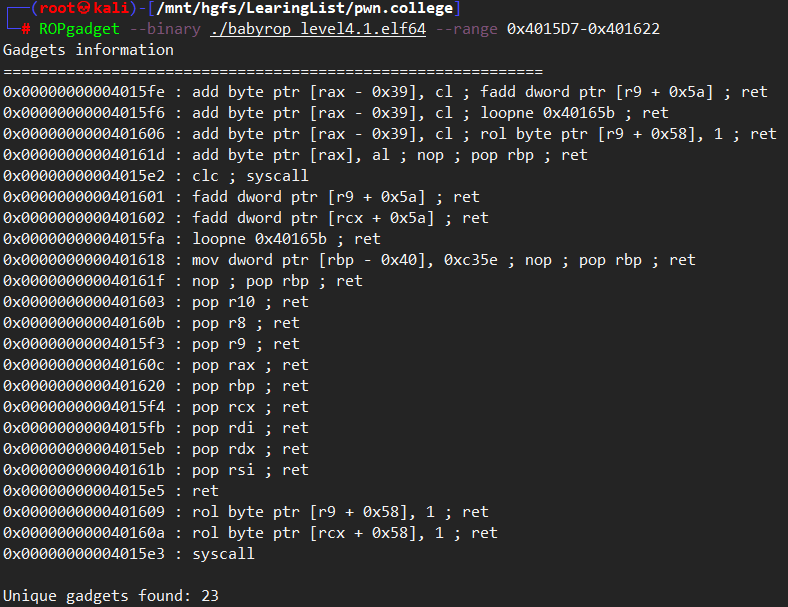
利用这几个gadgets就可以实现chmod系统调用了. (或者execve)
rdi是’/flag’字符串的地址, 存在栈上. 鉴于栈空间会不断的减少, 就存在challenge的栈帧中.
好吧, 这栈地址会变化的. 大意了, 栈帧底部有一个变量.
1 | |
level5
这一题在上一题的基础之上, 没有提示buf的所在位置.
突然想起来babyjail里面有一个openat. 我或许可以用fchmodat.
想出来了一个奇奇怪怪的方法, 在IDA中搜索到了字节序列'\x66\x00', 就是字符串f\0的表示,
在这之前要先使用ln -s /flag /home/hacker/f命令来创建符号链接, 再使用python来生成input,
最后再命令行中这样执行文件/challenge/babyrop_level5.1 <input 6<., 这样就行了.
或许可以使用别的字符串. 比如一些函数名.
1 | |
想出来这个是因为不知道怎么leak栈上的地址, 估计下几个level得直接完蛋吧…….
看以前的ctf发现也许可以使用write函数来打印栈上的内容, 肯定有一个指向栈上的指针的. 比如说main的rbp.没事了, write的地址也得是指向栈的指针, 属于是鸡和蛋的问题, 暂时没有新方法.
level6
这次没有了syscall, 只有一个现成的函数force_import, gadget也少了几个. 不过也简单. 保护没有变化.
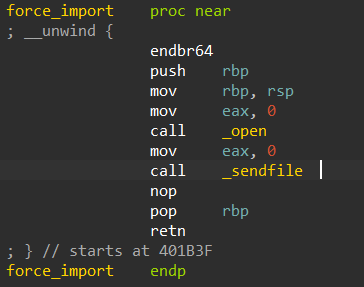
再加上challenge结束时的寄存器值:
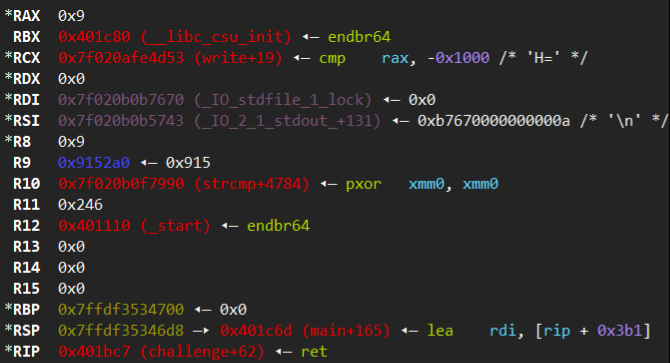
这样的话只要改改rdi rsi. (open多参数到底有没有问题???)
- 但是rsi同时作为open的oflag和sendfile的in_fd, 按理来说open一般会开出来3, 那么oflag就得是3了, 但很明显不能是3, 这样标志位会有冲突. 那么用一个文件占用fd3, 这样就会开到4. 如果oflag是4的话会被识别为只读.
- 接下来就是rdi的问题, open的参数是一个指向字符串的地址(‘e’, null-terminal string at 0x400457), 还要被用在sendfile的out_fd中, 而fd是int类型, 加上文件固定低地址执行, 这样子还要在命令行中开一个fd为4195415(0x400457)的输出文件.
然后发现bash并不能打开超过9的fd. 由操作系统分配的fd, bash是怎么控制的? 为什么只提供0-9?
一次执行这个函数有困难也可以执行两次.
- 第一次open(‘e’, 4), send(‘f’, 4, 0, 0x7f……), sendfile失败.
- 第二次直接跳到sendfile(1, 3, 0, 60), 因为open函数会修改rdi rsi等等, 从函数入口开始执行的话ROP设置的寄存器值就失效了.
1 | |
- 我开了aslr才能在gdb里面进行输入, 具体原因未知.
- 搞清楚了open的一些东西
- oflag用4字节中最低2bits表示, 按数值区别. mode参数只有在创建新文件的时候使用, 一般可忽略.
- libc中的open函数最终都会调用openat, 这样既能接受绝对地址也能接受相对地址.
level7
直接给我system函数的地址.
本地成功了, 现查system函数和/bin/sh字符串的偏移直接写出脚本, 但是远程不仅没法attach, 还不能strace, 明明就是那个偏移却运行不了. 难不成想让我用别的方法?
1 | |
level8
本地成功了, 远程懒得试.
1 | |
level9
stack pivot!!!!
以前做过了.
pop_rbp, bss_s[1], challenge || leave_ret, 0(useless rbp), pop_rdi[2] || got[puts], plt[puts][3], pop_rdi || str_binsh, system.
level10
开了PIE, 而且win是用mmap分配到一个随机的地址, 然后只给读和执行的权限, 所以主要利用的gadget还是在libc_csu_init里面的. 而aslr的开启导致stack的位置也是未知的.
由于gadget是在rodata段, ROPgadget无法分析, 所以在pwndbg中使用rop命令来分析mmap+mprotect后的区域.注意只有最后3位是有用的. rodata段是win函数, 通过mmap+memcpy复制到高地址空间中.
如果该段不可执行ropgadget也不会对这里进行分析.
不过在这一题中直接给出了buf的位置.
mmap的空间总是在ld共享库的上方, 和stack没有关联. 不过challeng中mmap的返回值就存在栈上, 也就是buf的上方8字节.
需要栈转移来将这个指针作为ret_address, 这样就可以直接跳到win.
因为有aslr, 所以gadget之间的数据需要固定一个值, 这个值可以在开了aslr的gdb中获取, 然后不断尝试直到新的一次第四位刚好和选中的值相等.
这次的幸运数字是0xd57000. 所有在ida看到的地址都要加上这一个偏移量.
1 | |
远程跑总是有点问题, 没法调试. 懒得管了.

level11
和上一题一样, 不过challenge()函数的主逻辑前后都加上了超级多的nop作为填充. 这有啥用?
确实没有区别. 改一改偏移量就过了.
level12
保护没有变化. 这又有什么区别?? 0号程序还提供了win函数的地址, 这不白给么.
- 突然就不行了, 使用gdb的record来查找问题, 好像只能在当前执行过程中使用save和restore命令.
- ROPgadget使用only命令的时候想要的命令要全部打出来, 而不仅是或的关系.
find /tmp -atime +5 -exec rm -rf {} +还是别用了.egrep '(pop (rbp|rsp))|leave' -a libc233.gadget==ROPgadget --binary /lib/x86_64-linux-gnu/libc-2.33.so --only 'pop|ret'
这题原来指的是从libc中进行ROP, 因为main函数返回到了高地址中的libc.so中.可以直接在libc文件中搜索可执行的ROP段.也不一定要leave, 还是不行. 乖乖leave吧.pop rsp不照样行.
2.33中:
1 | |
2.31中:
20x00000000000578f8 : leave ; ret
0x00000000000c7ad3 : leave ; ret 0xfff6main返回地址到libc偏移: 0x270b3
1 | |
诶得16*16*16分之1的几率啊, 这也太低了点, 不过想不出来了, 就这么干. 0x254000+0x4e250=0x2A2250
又发现地址好像和libc没什么关系, 是紧挨着ld.so的…这个方向错了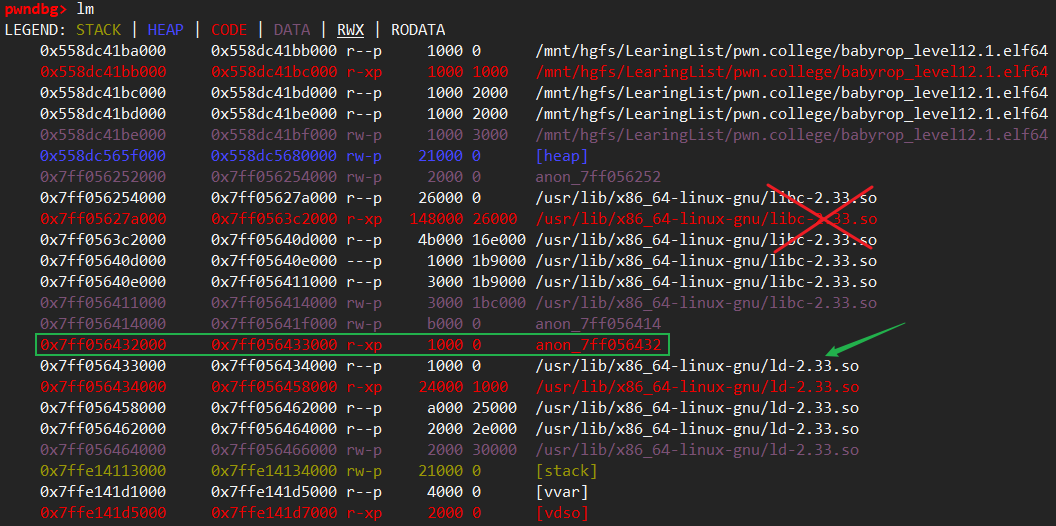
exp:
1 | |
level13
看看这题又要搞什么幺蛾子.
保护全开, 给出buf位置, 可以leak任意一个地址上8字节数据.
???这不leak一个canary出来, 然后返回地址改成….和上一题一样了. ret2libc
level14
socket
module B-heap
key:
Dynamic Allocators:
- General Purpose: Doug Lea (pictured) releases dlmalloc into public domain in 1987.
- Linux: ptmalloc (Posix Thread aware fork of dlmalloc)
- FreeBSD: jemalloc (also used in Firefox, Android)
- Windows: Segment Heap, NT Heap
- Kernel allocators: kmalloc (Linux kernel memory allocator)kalloc (iOS kernel memory allocator)
managed by the brk and sbrk system calls:
- sbrk(NULL) returns the end of the data segment
- sbrk(delta) expands the end of the data segment by delta bytes
- brk(addr) expands the end of the data segment to addr
ubuntu 2004还在图中粗线框的阶段, 这是由于tcache的引入. 不过这个module并不会深入这个cache.
tcache:
- a caching layer for “small” allocations (<1032 bytes on amd64)
- makes a singly-linked-list using the first word of the free chunk
- very few security checks
setvbuf: scanf and printf will use malloc in themselves for buffering, we can use
setvbuf(stdin/out, NULL)to disable it. (and avoiding confusion in heap exploitation.)ptmalloc caches(for review):
- 64 singly-linked tcache bins for allocations of size 16 to 1032(functionally “covers” fastbins andsmallbins)
- 10 singly-linked “fast” bins for allocations of size up to 160 bytes
- 1 doubly-linked “unsorted” bin to quickly stash free()d chunks that don’t fit into tcache orfastbins
- 64 doubly-linked “small” bins for allocations up to 512 bytes
- doubly-linked “large” bins (anything over 512 bytes) that contain different-sized chunks
The Unlink Attack, Poison Null Byte
module C-race
key points
- 在一个程序打开文件并写入然后再到执行它的期间进程可能被调度, 这个时候如果文件被改写那么就会出现竞态条件.
- 如果这个窗口太短那么竞态条件出现的几率就会更小
- 有一个系统调用nice, 对应于nice命令, 还有一个ionice, 就是字面意思上的run a program with modified scheduling priority
- 通过非常长的路径搜索可以减慢程序执行, 进而加大竞态窗口. 可以使用符号链接来循环查找同一根目录下的多条长路径, 来达到同样的效果.

- Mitigations
- Safer programming practices (O_NOFOLLOW, mkstemp(), etc).
- Symlink protections in /tmp
a. root cannot follow symlinks in /tmp that are owned by other users
b.specifically made to prevent these sorts of issues
- 非libc的库函数要直接进行编译要给gcc传递相应的链接参数.
- pthread:
pthread_t|pthread_create()|pthread_join():waits for the thread specified by thread to terminate.- 实际用的是
clone()系统调用.
- discrepancies between libc call and raw syscall:
- setuid() in libc sets the uid for all threads of the process, raw syscall will only set the caller thread.
- exit() in libc will call exit_group(), so exit all threads, but raw syscall only exit caller thread.
- 实际中常使用全局变量来控制线程的执行.
- 对内存的读写同样会产生竞态条件.
- Data races: 自增的多步骤指令. 不过可以通过上锁解决.
- Detect: valgrind, 学术界
- signals and reentrancy:
- use signal to interrupt normal execution control flow.
- use signal function to reenter function.
- DO NOT call non-reentrant funtions in your signal handlers.
- Your handler might have interrupted those functions mid-execution.
- Another signal might interrupt your signal handler’s non-reentrant invocations mid-execution!
- Depending on settings (
SA_NODEFERflag to sigaction()), another iteration of the same signal might interrupt your signal!
man signal-safetyto see all reentrant libc funtions.
YouTube-50是babyrace的视频. level5做不下去了准备看看.
补充:
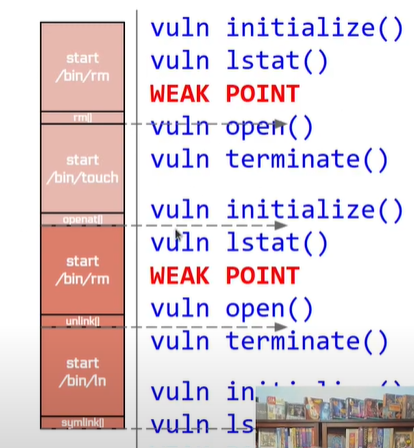
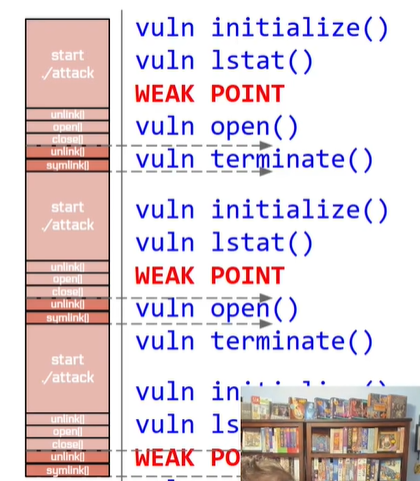
level5 shell script问题出在rm mv都有一个启动时间和一堆系统调用, 再加上shell是靠fork+exec来执行进程的, 所以就会比较慢, 可能会出现左图中的情况, 就算把几个命令分开进多个循环也还是太慢. 如果写进c, 那就是右图中的理想状态了:
使用python的话启动比较慢是事实, 但是进入执行之后到系统调用层面是和c差不多的, 所以只要在python里面进行loop就能达到一样的效果. 想起来前几天看的dirty cow使用的race condition的poc就是用c写的.
- python的话要大量使用到os module来调用系统. 可得好好看看.(练了练shell也不亏就是了)
prepare
先整个创建超级长的路径的脚本. 顺便学了学shell编程.
难怪视频里只见到t_end, 因为这样路径上每个文件夹其实都是符号链接, 所以最多20个.
1 | |
生成路径字符串: 如果路径上还有符号链接那还得再减少几个.
1 | |
level1
在程序使用第一个参数当做字符串open文件之前直接停下来等我, 这个时候就可以更改flag的符号链接为那个名字, 于是绕过了不能含有’flag’字符和不能是符号链接的限制.
.1程序的补充shell
1 | |
1 | |
删除一堆文件夹:
1 | |
成功率比较
改成短路径之后进行了一下成功率比较:
比较shellscript:
1 | |
结果:
不带sleep:
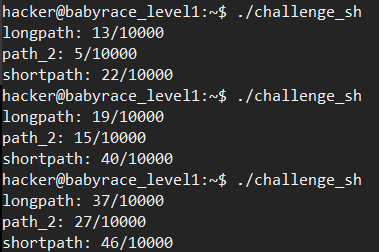
带了sleep(0.05s):
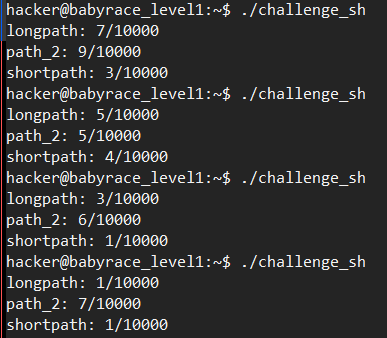
和好多因素有关, 不过不用sleep看起来更高效, 但是没见到长路径带来的好处…….
好了, 有了新发现, 产生竞态条件的shell脚本中第一个sleep看起来没什么意义然后尝试删除, 成功率直接大幅上涨:

不过长路径还是没啥作用. 如果不加上sleep 0.0005, 那么成功率直降为5/1000.
会随着sleep的时间波动, 还是0.0005最高. 在0.005的时候出现path_2的成功率最高. 全都是迷之行为, 至于nice就不试了….
level2
完全一样
level3
在前两题的基础之上检查大小不能超过256字节, 而且在buf[256]之后有一个控制进入win()的v7, 改改文件名很容易绕过
看了office hours, 用了python的os模块, 尝试了os.fork+分开unlink和symlink+strace程序的系统调用时间并分析窗口(这个窗口比较小). 没试出来什么更好的结果.
level4
利用上面的方法更改打开文件进行栈溢出然后改跳转地址跳转到win().
什么保护都没开, 固定地址加载.
level5
思考的一些过程……
接受一个绝对路径, 除了一些检查(symlink, argname), 还有文件所在目录所有者只能是root, 其他用户没有在此文件夹写的权限.
???? 不过在看了看dirname的实现之后发现并不需要一个绝对路径.
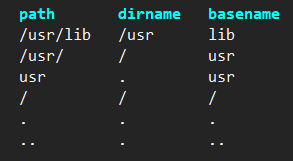
- 这样的话,
参数就定成/home/hacker下的e(0 size file),
dirname()只是一个字符串操作, 会截取前面的一部分路径. 所以不能在参数中使用相对路径, 否则dirname会返回当前文件夹: ., 这样没法绕过dirname, 工作目录又不能改成除了hacker之外的.
第一阶段只判断了文件存在与否以及符号链接(no follow lstat), 第二阶段才判断目录信息(use dirname() strip argv[1], and follow link stat), 第三阶段是真正的打开文件.
- 首先touch一个/home/hacker/aa/bb文件, 通过name和symlink验证,
- 然后ln两个/home/hacker/aa -> /home, 不用管bb其实根本不在/home中.
- 最后再ln一个/home/hacker/aa/bb -> /flag
也许有更好的办法, :
- 最开始创建
./1/aa/bb(plain file),./2/aa -> /home,./3/aa/bb -> /flag - 然后创建一个symlink叫做dir.
- 首先指向
./1, 然后指向./2, 最后指向./3. - 这样只要每次unlink dir然后再symlink相应数字文件夹名就行了.
完整路径名为/home/hacker/dir/aa/bb - 由于这样子实在太快导致窗口时间都跟不上了. 添加sleep, 大概是0.0001s
shell
写了一个脚本避免重复输入一些命令, 不过想清楚之后倒是一遍过了.
1 | |
woc, 我就说怎么不太像竞态条件, 原来.0只是教学, .1都没有getchar()这个函数了.
重新做一下.
1 | |
1 | |
过不了啊啊啊…
python大法+key补充
- unlink: delete a name from filesystem. 真是个集合了一堆功能的系统调用, 能删 文件 symlink socket FIFO device.
- 一些常数是用os.CONSTANT来调用的.
- 如果使用python的builtin function
open的话, 会调用fstat ioctl这种没有什么必要的函数. 可以使用os.open来调用低级的函数.
看视频尝试python写法:
1 | |
initpy:
1 | |
测试:
1 | |
结果:
1 | |
成功率最多就是20/10000, 2‰…….看视频去了, 不知道有没更好的. 太玄学了, 而且这是只是在一个4 core docker里面, 现实机器那不得更多进程+更多cpu内核+奇怪调度算法, 那是我能研究的?直接下一题, cow也是直接上大数量循环.
level6
和上一题相同, 不过dirname之后使用的是lstat, 不follow symlink……
???????????????????????????????
- 首先touch一个/home/hacker/a/home/b文件, 通过name和symlink验证,
- 然后ln两个/home/hacker/a -> /, 那么原path的dirname就是指: /home/hacker/a/home
- 最后再ln一个/home/hacker/a/home/b -> /flag
改版:
- 首先touch一个/home/hacker/1/a/home/b文件, 通过name和symlink验证,
- 然后ln个/home/hacker/2/a -> /, 那么原path的dirname就是指: /home/hacker/2(dir)/a/home
- 最后再ln一个/home/hacker/3(dir)/a/home/b -> /flag
1 | |
python:
unlink symlink只要0.000035s就可以完成系统调用.
1 | |
initpy:
1 | |
./dir/a/home/b
测试:
1 | |
成功率降到了20/20000, 变成千分之一了……..
level7
保护全开. 做不出来, 去看了看.0程序的race point在哪里.
没看懂. 噢, 我在discord上面看到了提示!!! 才想起来视频里有提到signal, 而且这次也有signal handler.
一开始还在想这岂不是要等十分钟, 然后突然想起来有系统调用可以给其他进程发送信号.
而且程序中的timeout_handler也只是执行logout而已. 这样race point就很明显了, 只要一次成功就可以了.
1 | |
有一个kill系统调用, 要知道pid参数的话那还是直接用pwntools启动, 不知道python的sendline耗时如何….算了不用了
- 总之命令行里启动challenge, 永真循环里echo
login和win_authed两条命令, 即login\nwin_authed\n. - 然后命令行永真循环, 不停kill pid 14.
非常直接, 成功率也是非常的低:
1 | |
level8
- 调试可以使用practice mode中的sudo gdb, 或者使用pwntools以非set_uid启动程序.
info thread+thread [num]- 第一个hit breadpoint的线程会停下来, gdb还会切换到那个线程上.
ps auxH显示线程.- 看了几眼python上的concurrent.futures
- 都在下面了. 主要就是processExecutor, 参数是上限, 形象成一个pool(进程池)可以根据需要使用.
ELF Handling For TLS | 哪位神的TLS variable文章 | 看起来不错的教程
上面是有关程序中使用的fs来定位线程私有变量的原理.
每个线程有自己的空间, 但是privilege_level是全局的. 使用pwntools开两个连接, 和上一题一样的做法.
成功率2/10000=0.2‰
1 | |
level9
看到个新模块psutil.
执行send_redacted_flag命令时, 向函数栈帧中的的缓冲区写入”REDACTED: “, terminated with null-byte, which is 11bytes long(plus null-byte). Then calling open->read to read flag into the buffer, right after the previous string’s null-byte.
if now try to use command receive_message to print out string containing the flag, the function will stop at 11th position, because write() function’s n argment is given by strlen() that evaluating string in global_message.
so the the procedure is as follows:
In one thread(connection), first send
send_redacted_flagcommand.Between this and next command, another thread send
send_messagecommand, overwrite until the global_message’s 11th char, before assigning null-byte to the end of string.
and first thread now continue executing at
receive_messagecommand. after the strlen() function, the return value means 11+[flag’s len], then used in the argment of write().
how to write script….
- two connections. one sends
send_redacted_flag -> receive_messagesequence, another sendssend_messagewith'whatthefuckisthat'continuously(or separated by space in a longlonglong bytestring).
1 | |
something interesting happen….
1 | |
by patching the program, something strange happened….. how does line 11 occur….? can write syscall to be interrupted and then reenter?
anyway, that’s the way it is.
level10
global_message with semaphore: sem_wait() + sem_post()……………
我又不会了…… 做这个真是违反直觉的思考. scp了.0程序, 希望能看出一点提示..没看出来.
level11
没看出和上一题有什么区别. 不过在discord上面看到了一点东西.
10, 11 have semaphores on broadcast, 11 has a printf instead of strlen-read
dicord上面都用的是sigpipe. 这个会调用pthread_exit()函数.
.0程序停在了message赋值的每一次循环, 这个时候可以发送sigpipe直接结束线程, 这样sem_post不会执行, global_message_mutex也不再可用, 意味着没有线程能够再进入critical section.
Or not consuming input so the writes to the socket block at the right time
不知道这能不能行. 这只能在send_message停下.
processes are as follows:
- one connection sends
send_redacted_flagcommand, then completes the str copy. - another or still the same connection sends
send_messagecommand withwhatthefuckisthis, causing overlapping the null-byte between prompt and flag. after null-byte, before last byte, sending SIGPIPE to stop thread. - another connection send
receive_message. - every program run can only test once.
succeeding in .0 practice.
module D-kernel
key point:
Intro:
- linux syscall DETAILS (linux inside) | linux_kernel_doc | syscall instruction | Attributes of Variables(gcc) |
- you cannot find noderef or address_space in the GCC docs because they are not GCC attributes. They have meaning only for Sparse.
about the effect.
- you cannot find noderef or address_space in the GCC docs because they are not GCC attributes. They have meaning only for Sparse.
- Modern solution to Rings: Ring -1, Hypervisor Mode. Able to intercept sensitive Ring 0 actions done by guests and handle them in the host OS.
- syscall High-level overview:
- At bootup, in Ring 0, the kernel sets MSR_LSTAR to point to the syscall handler routine.
- When a userspace (Ring 3) process wants to interact with the kernel, it car call syscall.
a. Privilege level switches to Ring 0.
b. Control flow jumps to value of MSR_LSTAR.
c. Return address saved to rcx.
d. That’s basically it! https://www.felixcloutier.com/x86/syscall - When the kernel is ready to return to userspace, it calls the appropriate return instruction (i.e., sysret for syscall).
a. Privilege level switches to Ring 3.
b. Control flow jumps to rcx.
c. That’s basically it! x86-64: rdi rsi rdx r10 r8 r9 -
We can see the 6 args are stored in these registers. rcx is used to store syscall return address, so args skip rcx.
- exploit dirctions:
- From the network: remotely-trigged exploits (packets of death, etc). Rare!
- From userspace: vulnerabilities in syscall and ioctl handlers (i.e., launched from inside a sandbox!)
- From devices
kernel module
lsmodlist kernel module. like device drivers(graphic card), filesystems, networking functionality, other stuff.
all with.koextension.
How to interact with kernel module for further exploitation?
- historically, kernel modules could add syscall entries. nowadays less used.
- interrupts. a module could register a interrupt handler to hook.
int3andint1are one-byte interrupt instructions which may be useful. - files.
/dev: mostly traditional devices (i.e., /dev/dsp for audio)
/proc: started out in System V Unix as information about running processes. Linux expanded it into in a disastrous mess of kernel interfaces.
/sys: non-process information interface with the kernel.- A module can register a file in one of the above locations.
Userspace code can read || open() that file to interact with the module!
or ioctl() function sends setting and querying non-stream data(i.e., webcam resolution settings as opposed to webcam video stream).
driver interaction:
- reads data from userspace (using
copy_from_user, a kernel API) - “does stuff” (open files, read files, interact with hardware, etc)
- writes data to userspace (using copy_to_user)
- returns to userspace
kernel module: kernel doc
- compilation:
- kernel modules are all listed in the
pwnkernel/src/ - at the end of the build.sh, there is a building modules procedure. it calls Make makefile in src dirctory then copys
.kofile to fs directory being mounted at/home/ctf. - so before compilation, adding an entry to makefile for newly added module.
- kernel modules are all listed in the
- command: must be used under root. Or sh not found.
insmodcommand: load kernel module. or throughinit_modulesystem call.lsmod: list all modules.rmmod: remove module.
- testing module:
hello_log.ko: just print something to kernel ring buffer.hello_dev_char.ko: register a character device. may use head, dd(with option like: if=/dev/pwn-college-char of=/proc/self/fd/1 bs=128 count=1) , etc, to read from it.hello_ioctl: exposes a /dev device with ioctl interfacehello_proc_char: exposes a /proc devicemake_root: exposes a /proc device with ioctl interface and an evil backdoor!
Privilege Escalation
SLIDE. in make_root.c.
Escape Seccomp
mainly disable TIF_SECCOMP bit. all in SLIDES.
1 | |
Yan demonstrates how to use make_root.ko to escape seccomp and escalating privilege.
memory managment
- linux use four level page table:
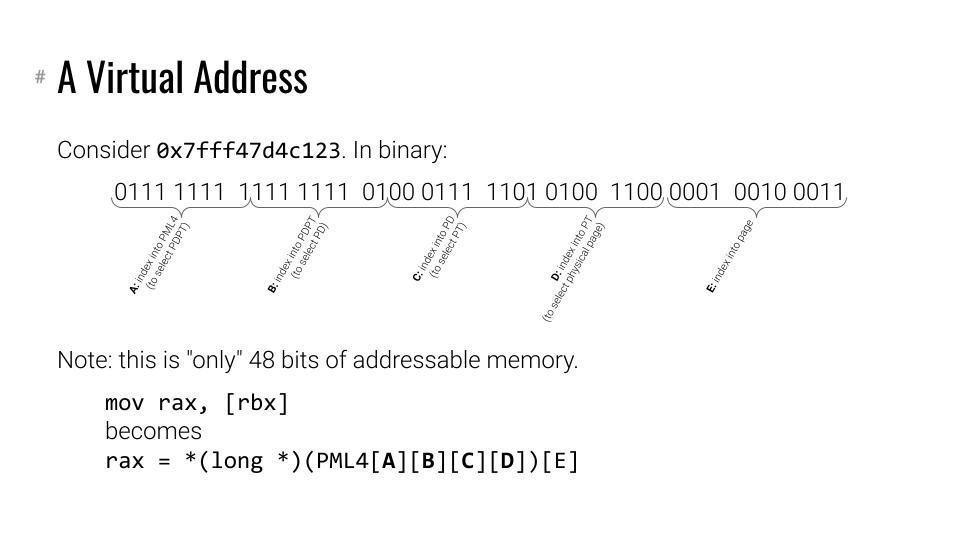
- only lower 48 bits are used in addressing. higher 12bits used to denote the kernel space. and ARM arch take these bits as tag for security concerns. android source | LLVM memory tagging |
- Virtual Machine isolation: The extended page table.
- MMU + TLB
- other architectures are analogous in paging. Linux requires a hardware MMU (although certain forks do not).
- The Old Way: Old Linuxes could access physical memory via /dev/mem as root.
The New Way: If you want to get at physical memory now, you must do it from the kernel. Physical memory is mapped contiguously in kernel’s virtual memory space for convenient access. Two macros,phys_to_virt()andvirt_to_phys().
Mitigations
SLIDES many links.
Stack canaries: leak the canary!
kASLR: leak the kernel base address!
Heap/stack regions NX: ROP!May support Function Granular ASLR.
Supervisor Memory Protection:
- SMEP.
Prevents kernel-space code from Executing userspace memory at all ever. - SMAP.
Prevents kernel-space from even Accessing userspace memory unless the AC flag in the RFLAGS register is set. Two ring0 instructions, stac and clac, manage this bit. - Why separate these? in SLIDES.
- SMEP.
kernel shellcode
- you cant use syscalls in kernel. just use call instruction with symbol addresses in /proc/kallsyms
- KASLR. if it is on, then I need to find a vulnerability to leak an kernel symbol address.
- indirect calls.
- seccomp escaping: notice gs segment register to figure out where the task struct is.
- The kernel is WAY too complex to figure out offsets manually.
Best option:- Write a kernel module in C with the actions you want
your shellcode to do. - Build it for the kernel you want to attack (e.g., using
the vm build command in pwn.college). - Reverse-engineer it to see how these actions work in
assembly. - Re-implement that assembly in your shellcode!
- Write a kernel module in C with the actions you want
- be careful with kernel code context! Try to have it act like a normal function and return when it’s done.
Env setup
build for old kernel 5.4: set up an environment
- first complie stopping at
thunk_64.o, due to missing symbol table.- revise
linux-5.4/tools/objtool/elf.cline 380 -> link
- revise
- then revise build.sh and take a vm snapshot.
- then revise
arch/x86/boot/compressed/pgtable_64.cto fix multiple definitions of__force_order. link - OK. total size is 4.3G. by
du -sh pwnkernel
VM by qemu:
require: new version of gdb, kernel with debug symbols, ASLR is off(in ./launch there is
-appendoption for qemu, check its usage).because the kernel is started with qemu, so can debug with gdb through port 1234.
gdb linux-5.4/vmlinux+target remote :1234(I added it into .gdbinit in pwnkernel/)cat /proc/kallsymsyou can see all symbols in kernel. because we disabled the kernel address space randomization, it will always be the same.only a limited number of commands will work in vm. look
ls /binfor details. Because the shell is provided by busybox, so there is a lack of functionality.use
sh -lorsu - ctfto load ~/.profile. there is some convenient aliases.
tips:
- wget command in build.sh has been added with -c option(–continue), which means that it won’t repeat downloadiing when there is an already existing file in the same directory.
mkdir -pno error if existing.
online environment
vm debug: I have no idea about what happened…….it suddenly worked and then shutdown…..- 太蠢了, 全都停不下来. 等会看一下writing kernel shellcode. 没用啊, 难不成全部都变成本地做? 也不是不行就是了…….
- 只是不能debug. 暂未发现解决办法.
level1
.0 level calls printk() function to give some info in kernel ring buffer. Obviously, .1 level doesn’t.
tested in ipython:
1 | |
level2
unlike previous level, there is no device_read() function, rather printk(flag) exists in device_write with password check.
script is the same way.
level3
the kernel module defines a win() function which will elevate the calling process privilege.
once pass the check, current process(i.e., ipython), will run as root. then use !cat /flag. everything is done.
even while the password is for previous level, it just still works……..
level4
hijack the kernel module by ioctl(). it is in python fcntl module. doc
in python fcntl.fcntl() almost equals to fcntl.ioctl(), except for ioctol’s arg argument can accept bytes.
script:
1 | |
level5
device_ioctl() calls __x86_indirect_thunk_rbx.
retpoline, __x86_indirect_thunk_rbx……what’re these?
here it is(here is repoline and google’s article). when debugging, I find that it just merely jumps to the address the register(rbx) points to. so many nested macros in kernel code…..
ATTENTION: The following piece of code in fact create a function, and in kernel module it calls the it. Thus module will push return address onto stack and when returning from the THUNK function it’ll come back to complete the rest of cleanups.
1 | |
what value dose the rbx hold before execute jmp rbx instruction? it is ioctl()’s arg argument.
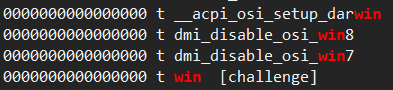
by cat /proc/kallsyms | grep win command, the win()’s address can be easily found. ffffffffc0000c5d t win [challenge]
but in pwn.college….
let’s give up this mysterious environment.
Now I know why it would happen……
normal user that doesn’t have enough privilege will find all kernel symbols with address 0.
then what should i do in pwn.college? emmmmmm
maybe i need to grep in practice mode and come back.
script:
1 | |
I win.

level6
begin kernel shellcoding!
- at the beginning of module, it calls
kmalloc()function to allocate a chunk of virtual address contiguous memory. the details of its argument are waiting to be check. - when writing to /proc/pwncollege, the device_write() in kernel will call
copy_from_user()to copy shellcode fromwrite()‘s buffer argument to shellcode variable. and jmp to shellcode address. - donot forget to restore kernel’s context after shellcode returns.
The ciritical point of shellcoding in kernel is we can only call kernel function. here i use prepare_kernel_cred() and commit_cred() to achive privilege escalation.
- two functions’ address:
1 | |
- then
commit_cred(prepare_kernel_cred(0))
reassembly code:
1 | |
- what would happen if device_write() return non-zero? first try to non-restore:
1 | |
The ret instruction equals to the ret in device_write(), and violate the conventions of caller-saved resgiter–rbx. it may crash the kernel. but in practice, it doesn’t.
script:
1 | |
win again.
1 | |
level7
execute shellcode through ioctl
after checking the code for a while, I found that it may need to define a struct to wrap up the arg for ioctl().
1 | |
the struct may be like:
1 | |
code near jmp:
1 | |
so i can reuse the rdi as the shellcode address.. emmmmm, use gdb.
1 | |
and the kmalloc() address……
1 | |
shellcode is same like previous level.
script:
1 | |
still win. but through a stupid way to find kmalloc()’s fixed address…..
level8
this challenge has two files. One for kernel module, the other for user land program to receive shellcode and add seccomp rules to itself(only write syscall is allowed).
nothing special.
level9
something strange in IDA…
Okay, just because the misdecompilation of memset(v8, 0, 66). in mechine code it is rep stod with rcx=66 rdi=dest rax=content. and it need modify the struct name in Structures window.
we should fill with this structure, and overwrite the function pointer:
1 | |
256 bytes shellcode and 8 bytes shellcode begin address.
ATTENTION:
call __x86_indirect_thunk_rax ; PIC modethis is a call instruction, so there is no need for fixing stack context in shellcode. Just simply add ret at the end of it is enough.
this module has local variable space on stack(and canary), so we can use the rdi to restore the stack context and make ret work normally.
1 | |
level10
I cannot figure out the difference between this and previous level…..
level11
have user land program with seccomp constraint(write).
and the pwncollege proc cannt be read by user:hacker. we can use write to do privilege escalation.
level12
first fork a child to read the flag into bss segment, then delete the flag.
Next read shellcode which can only use write syscall.
the shellcode use write() to communicate with pwncollege kernel module for privilege escalation purpose.
then use write() to print out the bss segment content.
module E-advance
key point:
- Core concept: security checks that do not properly use mutexes are ineffective in a multithreaded environment!
- keeps track of what do you know about the process and the program, what do you need to know, what you can do.
- Problem: we lack knowledge of:
- PIE base (binary address)
- ASLR base (library addresses)
- Stack base
- Heap base
- Canary
- may be a plan:
- Leak address of tcache_perthread_struct.
- Compute address of pointer to main_arena.
- Leak address of main_arena in libc’s BSS.
- Compute libc base address.
- Compute a thread stack address.
- Leak the canary and overflow the stack or Overwrite the return address with a ropchain!
- first: heap base, via tcache poisoning.
- use race condition showed in the vedio, interleave
freewithwrite.
- use race condition showed in the vedio, interleave
- When previous work is done, we get one address in per thread tcache memory. then by gdb it we can find the main_areana pointer in the same memory region. Then we have all threads heap metadata+libc base address.
- Exploit Primitives:
- the building block of complex exploitation:
arbitrary read, arbitrary write, arbitrary call. or controlled ones. - the slides demonstrate an exp example of multithread message storing service.
- use wrapped code for reuse intention.
- some gotchas:
- corrupted heap metadata: start a new connection
- burned bridges(pointer to not a valid heap chunk): avoid newly non-viable code paths.
- the building block of complex exploitation:
- kernel race:
- syscalls, file access, interrupts can be triggered simultaneously.
- prevention and recent situation in SLIDES
Pivoting Around Memory
- four major parts:
- The program itself
- The stack
- libc
- The heap
- Stack from libc:
__libc_argvorenviron- the
environvariable is just a pointer to the env on stack set up by the _start() function(maybe).
and the setenv() funtion allocates a chunk on heap for the new string. this function also copies all env strings’ pointer(to stack) to the heap, and add new env pointer to the end of it.lsdfk - the
setenv()copies the string, and theputenv()refers it.
- the
- libc from binary: reading GOT entries
- Program base from libc: pivoting through ld
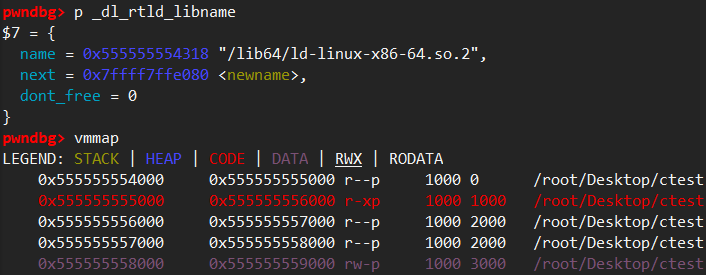
- libc always contains pointers into ld for runtime symbol resolution (in the form of the
_dl_runtime_resolvelibc GOT entry) - ld is also practically guaranteed to be at a constant offset from libc
- Either way, once the address of ld has been leaked, the
namefield of the global_dl_rtld_libnamestruct holds a pointer into the.interpsection of the main binary
- libc always contains pointers into ld for runtime symbol resolution (in the form of the
e.g.
1 | |
finally, i come to the last module level.
level1
emmmmmm, i thought i have to write the script above by my own hand.
failed to test the above program in kali2021, maybe the source code of tache is changed.
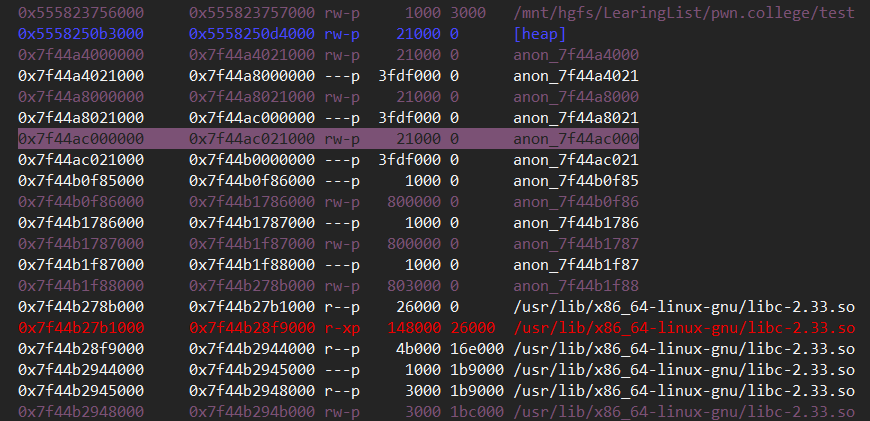
Ohhhhhh, i forget the thread local var is in high address space, so the tcache contains ‘\x7f’.
we can get the constant offset of libc and thread tcache address(0x7f44ac0008d0):
1 | |
we can notice that the first 8 bytes of the chunk is 0x00007f44ac000, which is not a valid high layout address. because libc 2.33 uses a newer technique: PROTECT_PTR macro.
1 | |
the server is using libc-2.31, which matches with ubuntu20.04. and this version doesn’t have PROTECT_PTR macro.
the result on my kali2021 is:
1 | |
we continue to check the content of address 0x00007f44ac0008d0 to look up for libc-based address, which is appeal to us.
by
x/512gx 0x00007f44ac0008d0, we can found the useful addresses in higher space than heap. just take one. and use the offset among known addresses to calc more addresses.
Okay, the beginning of the heap stores some infomation containing a pointer to main_arena. so we should use x/512gx 0x00007f44ac000000, which is page-aligned version of previous one.
then we can find this:
1 | |
These two are perfectly matched. and now we find the main_arena’s address.
level1
the additional command is send_flag, which calls load_secret() and strcmp() to check whether the pwd is correct. the answer is a randomized string taking the flag as seed. wont change between runnings.
in this level, the pwd is stored into bss segment in main function.
Thinking process:
we must leak the pwd through arbitrary read, and before the read we should also get the stack pointer of some stack frame.
and the secret_correct’s stack frame base is a constant offset by libc base which is 0x4640 in my kali2021. the pwd is stored in
ebp-0x20, and the length is 16 bytes.but secret_correct() has stack reuse protection:
memset(s2, 0, 0x11uLL)to set pwd string to NULL.emmmm………………….. should i try a race to read pwd before he clears out the PWD s2? I think not.
I can change the return address of
challenge()towin()after using quit command. by using the function’s ebp i can easily locate it.
or, in this level, main function puts the pwd into 0x405655, where we can directly read out from.
wtf, when i try to read the main_arean_addr, the value stored there begins with ‘\x0a’, which means ‘\n’ and will stop printf to print all the rest chars.
pwndbg> x/8bx 0x00007fbc880008900x7fbc88000890: 0xa0 0x9b 0x1a 0x8f 0xbc 0x7f 0x00 0x00Okay, that’s because i use the recvline, it will stop at the carrige return.
so we should use r1.clean() to receive message.
why would the printf print out the null bytes?????? Im so confused.
ohhhh, i think i get the point. before the printf prints out a string, it will check the string length by locating the null byte. and then it will call the write syscall to prints out all bytes(such as null byte). but in race condition, with previously filled AAAAAAAABBBBBBBB, after passing the length check, now printf is scheduled to free. then the ‘string’ is a tcache_perthread_ptr, the write syscall will directly prints it out.
but we can’t read the null byte in, nor the white characters.we can scanf null bytes into the buffer. the scanf simply adds a \0 to the end of the string, without checking whether there are null bytes in it . what a surprise.
Again, i forgot the libc version on my kali is 2.33. stucked in why tcache poisoning don’t work, neglected the PROTECT_PTR macro.
but i figure out that the chunk 0 is at a constant offset from the tcache_perthread_struct address, which is 0x650. the tcache link at the end of controlled_allocation is like this: tcache_entry[i]->chunk_0->packed address

and what we all need is addr(@packed) and chunk0 addr(now we get it), and then perform calc like this: (addr>>12)^packed.
but the second time using arbitrary read it says: malloc(): unaligned tcache chunk detected , that’s because the target 0x405655 is not aligned with 16 bytes in x86-64 machine. however, using 0x405650 as string start address will encounter the problem that it starts with the null bytes.
1 | |
so we could use arbitrary_write() to change address stored in message[2], and only need to change the last byte. scanf will read in null byte, so it needs full address to be packed.
finally, i use this plan(as follows). change the message’s content to another place where we want to overwrite.
1 | |
full exp:
1 | |
there is no difference between .0 and .1 level.
level2
protections are all turned on.
there is no load_secret() function in main, so the last way may be rewriting the retrun address of challenge().
for test:
1 | |
it’s so hard to do with libc-2.33. the memory align check is annoying. just assuming that the binary base is already known.
fail exp:
1 | |
level3
a hint from the code:
1 | |
so it’s quite easy, just need to locate the challenge’s frame base.
the stored_rip_addr is at a constant offset from the challenge’s frame base.
level4
nothing special
level5
Storing the secret in the environment by setenv(). env is pointed by the environ in libc. i need to have a look at that blog to learn how to dig into ld library. let me add a new section in key points.
distance libc_base ld_base = 0x1df000 bytes. the secret is stored in the main thread heap.
plan:
wrong start:
at first read out of the binary base(in kali the only way i can is cheat…)locating the env string in heap. read out of it.
- after read out the main_arena’s base, read out the
topfield content, which is the top chunk of the main thread near the binary. it won’t change when child threads receiving and processing commands. - next locate the distance between the top_chunk and secret’s address. this is also a constant.
- read out the secret.
- then use
send_flagcommand. or just change the return address of challenge.
exp(the second method):
1 | |
level6
Storing the secret in the main thread’s heap.
what the difference with the previous one?
level7
there is no send_flag command and win() function.
1 | |
level8
emmmm, i can’t figure out the difference.
ohhhh, it use the pthread_exit(), not the normal return, so the rop attack to the return address is no longer viable.
i may alter another thread’s return address, such as thread 3 scanf return. It just lies on the top of the challenge’s stack frame, so it is at the constant offset from somewhere in high address space.
address of the return address pointer of thread 3 scanf is stored at where at a constant offset from store_rip_address with
-0x801000bytes distance.
okay, the fscanf doesn’t have push rbp this procedure, so calc the distance between fscanf and stored_rip_address by rbp+8 is purely inaccurate. the actual address of its return address should be checked by gdb into stack:

the pwntools is going crazy, i’m gonna crazy.
- the read syscall with first arg being 0 won’t simply work as i thouhgt. there is something strange when communicateing with main thread’s stdin/stdout – could child thread be influenced by it?
- or try to calc the address of tcp channel fd(in TLS addressing by fs register)?
the
mov rax, fs:0x28means referencing the value stored in fsbase+0x28 then copy it to rax. there is no shifting.the second method looks more feasible. here it is(calc from libc_base):

okay, it’s stream pointer, i go wrong again.
when i follow the pace of fscanf, i found that it finally use fd=6 to read data in.
Fine, I am now absolutely grasping the principles. the first problem above is just a misunderstanding of all the file descriptor and file stream and threads.
- in this program, main thread use
accept()to receive a socket connect and return afd. thenrun_thread()usefdopen()to turn fd into a FILE* stream, and write this FILE pointer into thread local storage(that is fs-based addressing). - the FILE stream and file descriptor are interchangeable, first is a high level interface, the second is a low level interface. child threads use
fscanfandfprintfto read from or write to the stream(that is fds), that means the whole program’s stdin, stdout, and stderr is still viable in chile thread. soread(0, libc.bss(), 0x400)is correct. - one more thing needed to notice is that before thread 3 returns from fscanf, somewhere on the stack will be overwritten with what bytes I send into. so I additionally calc the right gadget of
pop rdiso that the ropchain works.
exp:
1 | |
level9